【kubernetes/k3s/docker】1コマンドでk3s(kubernetes)クラスター(Control Plane×1/Worker×2)をdocker上で構築する

本記事で行うこと
モチベーション
- docker desktopに付属しているKubernetesはリソースを使うため絶対使いたくないため。 かなり重たいと思う。仕事用PCとかで実行した日には大変です。
- メンバーが学習用に利用できるKubernetes環境がほしかったため。
- docker環境さえあれば同じ環境が作れるようにしたかったため。
- Control Plane×1 Worker×2の構成を作りたかったため。
環境
- intel macbook pro/m1 macbook air
- docker desktop
docker-compose.yamlの準備
- 以下のようなdocker-composeを準備します。
- 忙しい人は以下のリポジトリを用意したのでcloneしてください。
- docker-compose.yaml
- 80,443はingress用のポート、10080,20080,10443,20443はnodeport用ポート、6443はkubectlでアクセスする用のポート。
- k3sのバージョンは何も指定しなければlatestにしています。
version: "3"
services:
  server:
    container_name: k3s-controller
    hostname: k3s-controller
    image: "rancher/k3s:${K3S_VERSION:-latest}"
    command:
      - server
      - --kube-apiserver-arg=cors-allowed-origins=['*']
    tmpfs:
      - /run
      - /var/run
    privileged: true
    environment:
      - K3S_TOKEN=${K3S_TOKEN:?err}
      - K3S_KUBECONFIG_OUTPUT=/output/kubeconfig.yaml
      - K3S_KUBECONFIG_MODE=600
    volumes:
      - k3s-server:/var/lib/rancher/k3s
      # This is just so that we get the kubeconfig file out
      - .:/output
      - ./localdir:/localdir
    ports:
      - 6443:6443
      - 80:80
      - 443:443

  agent1:
    container_name: k3s-worker1
    hostname: k3s-worker1
    image: "rancher/k3s:${K3S_VERSION:-latest}"
    tmpfs:
      - /run
      - /var/run
    privileged: true
    environment:
      - K3S_URL=https://server:6443
      - K3S_TOKEN=${K3S_TOKEN:?err}
    volumes:
      - ./localdir:/localdir
    ports:
      - 10080:80
      - 10443:443

  agent2:
    container_name: k3s-worker2
    hostname: k3s-worker2
    image: "rancher/k3s:${K3S_VERSION:-latest}"
    tmpfs:
      - /run
      - /var/run
    privileged: true
    environment:
      - K3S_URL=https://server:6443
      - K3S_TOKEN=${K3S_TOKEN:?err}
    volumes:
      - ./localdir:/localdir
    ports:
      - 20080:80
      - 20443:443

volumes:
  k3s-server: {}
k3sクラスターの起動
docker-compose up
- このコマンド一発でクラスタが立ち上がります。
- Docker Desktop 3.4.0以降では、
docker-composeの代わりにdocker composeがデフォルトで利用できるようになりました。 docker composeについては以下をご参照ください。
Compose V2 | Docker ドキュメント今回は
docker-composeで行いますがdocker composeで可能です。
$ K3S_TOKEN=${RANDOM}${RANDOM}${RANDOM} docker-compose up -d

$ K3S_TOKEN=${RANDOM}${RANDOM}${RANDOM} docker-compose ps
     Name                   Command               State                                                       Ports
-----------------------------------------------------------------------------------------------------------------------------------------------------------------------
k3s-controller   /bin/k3s server --kube-api ...   Up      0.0.0.0:443->443/tcp,:::443->443/tcp, 0.0.0.0:6443->6443/tcp,:::6443->6443/tcp,
                                                          0.0.0.0:80->80/tcp,:::80->80/tcp
k3s-worker1      /bin/k3s agent                   Up      0.0.0.0:10443->443/tcp,:::10443->443/tcp, 0.0.0.0:10080->80/tcp,:::10080->80/tcp
k3s-worker2      /bin/k3s agent                   Up      0.0.0.0:20443->443/tcp,:::20443->443/tcp, 0.0.0.0:20080->80/tcp,:::20080->80/tcp
kubectlで確認
$ export KUBECONFIG=./kubeconfig.yaml
$ chmod 600 kubeconfig.yaml

$ kubectl get nodes
NAME             STATUS   ROLES                  AGE   VERSION
k3s-controller   Ready    control-plane,master   38s   v1.22.2+k3s2
k3s-worker1      Ready    <none>                 31s   v1.22.2+k3s2
k3s-worker2      Ready    <none>                 30s   v1.22.2+k3s2
k3sクラスターの削除
remove k3s
- 以下のコマンドでk3sの停止&削除
# run docker
$ K3S_TOKEN=${RANDOM}${RANDOM}${RANDOM} docker-compose down
remove data
- 以下のコマンドでk3sのデータを削除
- volume名は実行環境のディレクトリによって変わります。
$ docker volume rm mac-k3s-sample_k3s-server
あとがき
【ubuntu 20.04/GMK NucBox】windows10を削除してubuntu 20.04をUSBからインストールする

本記事で行うこと
- GMK NucBoxのwindows10を削除してubuntu 20.04をUSBからインストールする
本記事で行わないこと
- ubuntu 20.04のUSBの準備
モチベーション
- intell nux11でkubernetes環境(k3s)をシングルノードで動かしていたが、やっぱりControl Plane/Workerの構成にしたかったため。
- リソースを確保するため軽量kubernetesのk3sを使っていたがkubeadm方式のkubernetesに変更したかったため。
- 貧乏性なので消費電力が少ないLinuxマシンかつ、それなりのスペックのものでControl Planeを作成したかったため。
GMK NucBoxとは
- GMK NucBoxとは手のひらより小さいミニPCです。
- ミニPCながらIntelJ4125 4コア 8GB DDR4 RAM 128GB SSD、HDMIポートによる4K HD、デュアルバンドWi-Fi、BT5.1の申し分ないスペックを持っています。
- IntelJ4125はCeleronながらPassmarkのスコアで3040を記録しており、付属の12Vの電源アダプターで十分動作するため購入を決めました。
- 詳しいスペックは以下を参照ください。
NucBox")

Passmarkの余談
- 左から、GMK NucBox、nux11 i3、raspberry pi 3 model b+、M1 macbook air、intel macbook pro 2019
- kubernetesのWorkerにはnux11 i3を利用しており、DNS serverとしてraspberry piを使っています。
- intel macbook proは本職の仕事で使っているのですが、プライベートで使っているM1 macbook airは15149となっており化け物です。
- 実際私自身M1 macbook airを使ってからintel macbook proのbuildが遅くてとてもイライラするようになってしまいました。
- DNS serverとして使っているraspberry piはdocker上でdnsmasqをたてて使っているのですがスペックが低くても家庭で使う分には問題なく動作します。
- nuc11,raspberry pi(DNS)はいずれ記事にしようかなと思います。(多分)

ubuntu 20.04をUSBからインストール
- まずubuntu 20.04が入ったUSBを用意します。
- ubuntuは公式サイトから入手できます。 jp.ubuntu.com
windows10のライセンス
- GMK NucBoxはwindows10のライセンスが付属しています。
- せっかくなのでとっておきましょう。
- ライセンス認証の部分でMicrosoftアカウントにリンクされた〜とあれば、特にwindows上で作業は不要です。
- オンラインであとから別のPCに移行が可能なので、ubuntuインストール時に一思いに消しましょう。


USBからbootインストール
- 写真のようにUSBを指した状態で再起動し、F2キーを押しっぱなしにしておくとbootメニューが立ち上がるので、ubuntsを選択します。
ぐさっ


installが始まるのであとは画面の支持にしたがって進めれば終わりです。。


- ここまで行けば終了です。
- macでキャプチャしてたら画像汚くなちゃった・・・
GMK NucBoxの写真ギャラリー
- ただの写真。ちっちゃくてかわいい


【kubernetes/k0s】VirtualBoxとCentOS7とk0s(v0.11.0)マルチクラスターとRancher(v2.5.6)とIngress controller環境の構築

- 本記事で行うこと
- モチベーション
- 環境
- macbook proを閉じてもスリープしない設定
- k0sとrancherの構成図
- CentOS7のインストールと設定
- Dockerのインストール&起動設定
- CentOS7のコピー&設定(nmcli ip固定)
- Rancher2.5.6のインストール(Docker base)
- k0s(v0.11.0)インストール
- kubectlのインストール(オプション)
- Rancherからk0sを操作
- 後書き
本記事で行うこと
- macbook proを閉じてもスリープしない設定
- VirtualBoxの設定
- CentOS7のインストールと設定
- Dockerのインストール
- CentOS7のコピー&設定(nmcli ip固定)
- Rancher2.5.6のインストール(Docker base)
- k0s cluster(Kubernetes)構築
- Rancherからk0sを操作
- nginx podとtraefik Ingress controllerの動作確認
モチベーション
- M1 macbook airを買ってmacbook proが一台余ったので、汎用的なkubernetes cluster serverとして利用したい。
- 社内でkubernetesのスキトラコンテンツ作成ために検証用kubernetes cluster serverが欲しかった。
- macbook proはそこまでスペックが高くないので軽量なk8s環境としてk0sを使って見ようと思った。
環境
- 余ったmacbook pro
$ sw_vers
ProductName:    macOS
ProductVersion: 11.2.2
BuildVersion:   20D80
- macbook proのスペック

- m1 macbook air
$ sw_vers
ProductName:    macOS
ProductVersion: 11.2.1
BuildVersion:   20D74
macbook proを閉じてもスリープしない設定
sudo pmset -a disablesleep 1
※戻す場合は0で更新する。
k0sとrancherの構成図
- 今回は自宅のNWで以下のような構成とします。

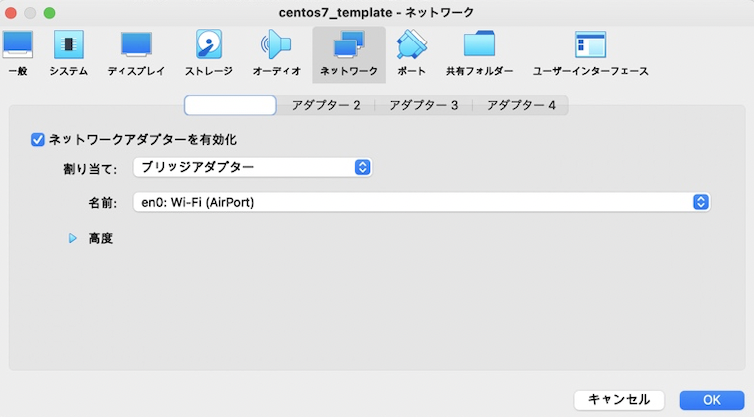
CentOS7のインストールと設定
- 以下の公式ページからCentOS7.9のisoファイルをダウンロード。
https://www.centos.org/download/ - インストール画面で今回はhaku-maiという管理者ユーザを作っておきました。
- NWは自宅のNWからDHCPでIPが振られるようにブリッジアダプターにしています。
macからssh接続するまでの設定
- 一時的にSELinux無効
$ sudo setenforce 0
- fiewwalld停止
$ sudo systemctl stop firewalld
- dhcpで振られたip確認
$ ip a
$ ssh haku-mai@ip
- ロケールの修正
$ localectl set-locale LC_CTYPE=ja_JP.utf8
- SELinux無効
$ sudo sed -i -e "s/^SELINUX=enforcing$/SELINUX=disabled/g" /etc/selinux/config
- fiewwalld自動起動OFF
$ sudo systemctl disable firewalld
Dockerのインストール&起動設定
以下スクリプトでインストールする。
Install Docker Engine on CentOS | Docker Documentation
$ cd /tmp
$ curl -fsSL https://get.docker.com -o get-docker.sh
$ sudo sh get-docker.sh
$ sudo usermod -aG docker haku-mai
$ docker -v
Docker version 20.10.5, build 55c4c88

$ systemctl status docker
$ systemctl enable docker
- shutdown
$ sudo shutdown -h now
- 以上でテンプレート完了。
CentOS7のコピー&設定(nmcli ip固定)
以下のようにコピーする。

dhcpで振られたip確認
$ ip a
- そのipでそれぞれ固定化
$ nmcli d
DEVICE   TYPE      STATE      CONNECTION
enp0s3   ethernet  connected  enp0s3
docker0  bridge    unmanaged  --
lo       loopback  unmanaged  --

$ nmcli d show enp0s3<br>
$ sudo nmcli con modify enp0s3 ipv4.method manual ipv4.addresses {サーバーに設定したいip}
$ sudo nmcli con modify enp0s3 ipv4.gateway {gatway ip}
$ sudo nmcli con modify enp0s3 ipv4.dns  "{dns ip} {secondary dns ip} {gatway ip}"
$ sudo nmcli con modify enp0s3 ipv4.routes "自宅のNWセグメント 自宅のルータのIP"
- ホスト名変更
$ sudo hostnamectl set-hostname rancher.haku-mai
$ sudo hostnamectl set-hostname k8s-controller.haku-mai
$ sudo hostnamectl set-hostname k8s-worker1.haku-mai
$ sudo hostnamectl set-hostname k8s-worker2.haku-mai
Rancher2.5.6のインストール(Docker base)
2021/3/5時点で最新のv2.5.6で実行。
[haku-mai@rancher ~]$ docker run -d --restart=unless-stopped \
  -p 80:80 -p 443:443 \
  --privileged \
  rancher/rancher:v2.5.6
[haku-mai@rancher ~]$ docker ps
CONTAINER ID   IMAGE                    COMMAND           CREATED          STATUS          PORTS                                      NAMES
88e931ff0047   rancher/rancher:v2.5.6   "entrypoint.sh"   35 seconds ago   Up 33 seconds   0.0.0.0:80->80/tcp, 0.0.0.0:443->443/tcp   peaceful_mcclintock
docker logs -f でログを見つつ気長に待つ。
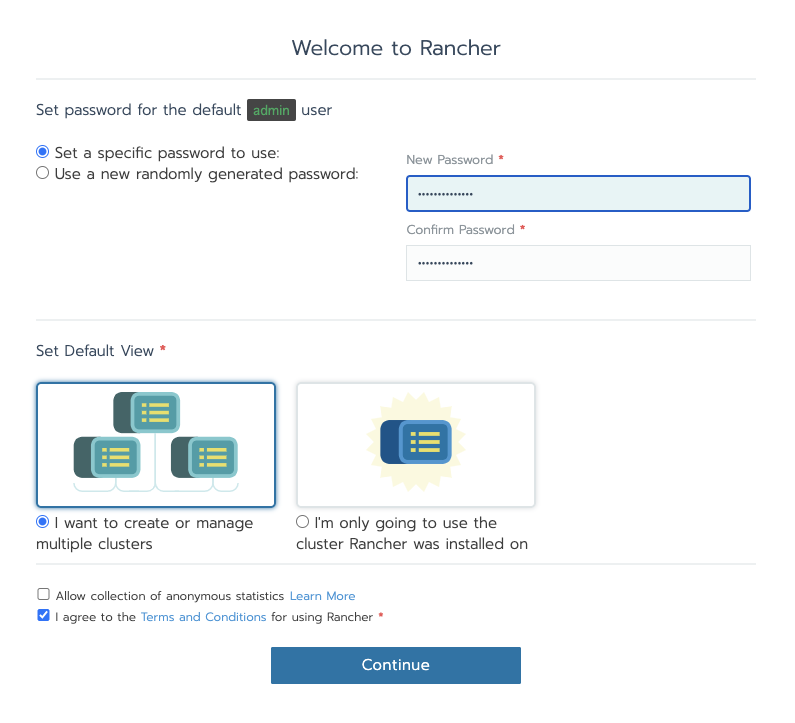
以下のように起動して、adminのパスワードとURLの設定を行う。


k0s(v0.11.0)インストール
- 以下公式手順にしたがって行う。
- Install k0s - Documentation
worker, controller 共通
- 2021/3/14時点で最新の
v0.11.0を導入する。
$ export K0S_VERSION=v0.11.0; echo $K0S_VERSION
v0.11.0
$ curl -sSLf https://get.k0s.sh | sudo sh
$ k0s version
v0.11.0
controllerでclusterの構成ファイル作成
- 構成ファイルを作成する。
$ k0s default-config > k0s.yaml
spec.api.addressとspec.api.sansがcontrollerのipになっていることを確認して保存します。
apiVersion: k0s.k0sproject.io/v1beta1
images:
  konnectivity:
    image: us.gcr.io/k8s-artifacts-prod/kas-network-proxy/proxy-agent
    version: v0.0.13
  metricsserver:
    image: gcr.io/k8s-staging-metrics-server/metrics-server
    version: v0.3.7
  kubeproxy:
    image: k8s.gcr.io/kube-proxy
    version: v1.20.4
  coredns:
    image: docker.io/coredns/coredns
    version: 1.7.0
  calico:
    cni:
      image: calico/cni
      version: v3.16.2
    flexvolume:
      image: calico/pod2daemon-flexvol
      version: v3.16.2
    node:
      image: calico/node
      version: v3.16.2
    kubecontrollers:
      image: calico/kube-controllers
      version: v3.16.2
installConfig:
  users:
    etcdUser: etcd
    kineUser: kube-apiserver
    konnectivityUser: konnectivity-server
    kubeAPIserverUser: kube-apiserver
    kubeSchedulerUser: kube-scheduler
kind: Cluster
metadata:
  name: k0s
spec:
  api:
    address: 192.168.68.140
    sans:
    - 192.168.68.140
  storage:
    type: etcd
    etcd:
      peerAddress: 192.168.68.140
  network:
    podCIDR: 10.244.0.0/16
    serviceCIDR: 10.96.0.0/12
    provider: calico
    calico:
      mode: vxlan
      vxlanPort: 4789
      vxlanVNI: 4096
      mtu: 1450
      wireguard: false
      flexVolumeDriverPath: /usr/libexec/k0s/kubelet-plugins/volume/exec/nodeagent~uds
      withWindowsNodes: false
      overlay: Always
  podSecurityPolicy:
    defaultPolicy: 00-k0s-privileged
telemetry:
  interval: 10m0s
  enabled: true
controllerのインストール
$ sudo k0s install controller
$ sudo systemctl start k0scontroller
$ sudo systemctl enable k0scontroller

$ sudo k0s status
Version: v0.11.0
Process ID: 1849
Parent Process ID: 1
Role: controller
Init System: linux-systemd
controllerでworker参加用のtokenを作成
$ sudo k0s token create --role=worker > k0s.token
workerのインストール
- controllerから構成ファイルと、tokenを取得する。
$ scp haku-mai@192.168.68.140:~/k0s.yaml ./
$ scp haku-mai@192.168.68.140:~/k0s.token ./
$ sudo mkdir /opt/k0s
$ sudo mv ./k0s.token /opt/k0s/
$ ls /opt/k0s/
k0s.token
- workerのインストール
$ sudo k0s install worker --token-file /opt/k0s/k0s.token
$ sudo systemctl start k0sworker
$ sudo systemctl status k0sworker
$ sudo systemctl enable k0sworker
controllerから確認
- k0sではcontrollerはk8sのnodeとして扱われない。
- したがって、controllerもworkerとして参加しないと何も稼働しない。
$ sudo k0s kubectl get nodes
NAME                   STATUS   ROLES    AGE    VERSION
k8s-worker1.haku-mai   Ready    <none>   3m5s   v1.20.4-k0s1
k8s-worker2.haku-mai   Ready    <none>   89s    v1.20.4-k0s1
kubectlのインストール(オプション)
- 毎回
k0s kubectlとコマンドを打つのが面倒なのでkubectlをインストールします。(エイリアスで誤魔化してもいいのです。) - 以下公式手順にしたがってインストールします。
kubectlのインストールおよびセットアップ | Kubernetes
controllerでkubectlのインストール
- インストールしたk0sに合わせて
v1.20.4とします。
$ curl -LO https://storage.googleapis.com/kubernetes-release/release/v1.20.4/bin/linux/amd64/kubectl
$ chmod +x ./kubectl
$ sudo mv ./kubectl /usr/local/bin/kubectl
$ kubectl version --client
Client Version: version.Info{Major:"1", Minor:"20", GitVersion:"v1.20.4", GitCommit:"e87da0bd6e03ec3fea7933c4b5263d151aafd07c", GitTreeState:"clean", BuildDate:"2021-02-18T16:12:00Z", GoVersion:"go1.15.8", Compiler:"gc", Platform:"linux/amd64"}

$ mkdir .kube
$ sudo cp /var/lib/k0s/pki/admin.conf .kube/k0s.conf
$ sudo chown haku-mai:haku-mai .kube/k0s.conf
$ echo "export KUBECONFIG=$HOME/.kube/k0s.conf" >> .bashrc
$ source .bashrc
$ echo $KUBECONFIG
/home/haku-mai/.kube/k0s.conf
- 確認
$ kubectl get nodes
NAME                   STATUS   ROLES    AGE   VERSION
k8s-worker1.haku-mai   Ready    <none>   26m   v1.20.4-k0s1
k8s-worker2.haku-mai   Ready    <none>   25m   v1.20.4-k0s1
Rancherからk0sを操作
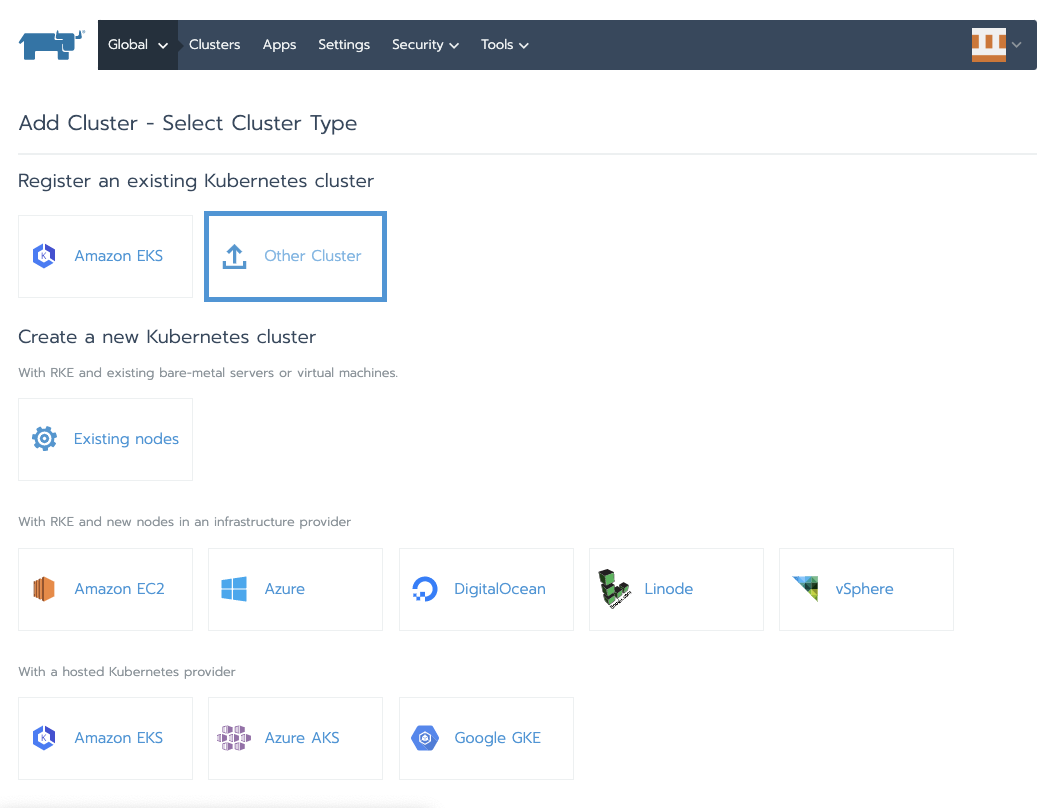
Rancherからk0sをimportする
- 以下のように既存clusterをimportするようのyamlを生成する。


controllerからRancherを適応する
- controllerから生成したyamlを適応します。
$ curl --insecure -sfL https://192.168.68.139/v3/import/fqmlg9sl9p6wslcrz4gvsbjc24hlnm5tfcqmm8dx6kszsjzg4n4dfk_c-6hhlk.yaml | kubectl apply -f -
- しばらく待って以下のように表示されれば完了。


動作確認(nginxをNode Portで起動)
以下のように設定する。


Node Portで起動していることが確認できる。


動作確認(オプション: traefik Ingress Controllerの作成とL7ロードバランスの設定)
以下のようにtraefikをsystem projectからdeployする。


わかりやすいようにNordPort
30080,30443に変更します。(オプション)Service Discoveryからtraefikをeditしshow advanced optionsからNordPortを変更。

default namespaceのworkloadでingressルールを作成。
既存のルールを削除して、serviceルールを以下のように追加。

- 問題なくアクセスできていることを確認。
$ curl -H "Host:test-ingress" http://192.168.68.141:30080
<!DOCTYPE html>
<html>
<head>
<title>Welcome to nginx!</title>
<style>
    body {
        width: 35em;
        margin: 0 auto;
        font-family: Tahoma, Verdana, Arial, sans-serif;
    }
</style>
</head>
<body>
<h1>Welcome to nginx!</h1>
<p>If you see this page, the nginx web server is successfully installed and
working. Further configuration is required.</p>

<p>For online documentation and support please refer to
<a href="http://nginx.org/">nginx.org</a>.<br/>
Commercial support is available at
<a href="http://nginx.com/">nginx.com</a>.</p>

<p><em>Thank you for using nginx.</em></p>
</body>
</html>
後書き
- この環境の今後、簡易検証環境 and 自宅アプリの実行環境として利用していきます。
- k0sを初めて使ってみましたが、rancherでRKEをインストールする場合より(定性的ですが)かなり軽いなという印象です。
- という良り、上記macbook proのスペックだとRKEの推奨動作環境を満たしておらず、実際にデプロイしてみたのですが、通信が切れたり、podが落ちたりしまいなかなかまともに動かなたっかです。
- k0sのマルチクラスターの例があまりネット似なかったので、記事にしてみました。
- 最後に、k8sの勉強でお世話になっている本とこの記事を書いていた時に飲んでいた第3のビールをのせておきます。

![[Amazon限定ブランド] 【新ジャンル/第3のビール】2ケースまとめ買い サントリー 金麦 [ 350ml×48本 ] SPBC](https://m.media-amazon.com/images/I/618pl9oVTSL.jpg "[Amazon限定ブランド] 【新ジャンル/第3のビール】2ケースまとめ買い サントリー 金麦 [ 350ml×48本 ] SPBC")
[Amazon限定ブランド] 【新ジャンル/第3のビール】2ケースまとめ買い サントリー 金麦 [ 350ml×48本 ] SPBC
- 発売日: 2020/03/17
- メディア: 食品&飲料
![【新ジャンル/第3のビール】アサヒ ザ・リッチ [ ビール 350ml×24本 ]](https://m.media-amazon.com/images/I/513w03qdkpL.jpg "【新ジャンル/第3のビール】アサヒ ザ・リッチ [ ビール 350ml×24本 ]")
【新ジャンル/第3のビール】アサヒ ザ・リッチ [ ビール 350ml×24本 ]
- 発売日: 2020/03/17
- メディア: 食品&飲料
【Flask/Python】Nature RemoをWeb画面から操作するWebサイトを作成する。めっちゃ詳細解説。(OSSとしてgithubに公開)
今回作成したサイトは、 一応 Nature スマートリモコン Nature Remo 3 ネイチャーリモ Remo-1W3 Alexa/Google Home/Siri対応 Nature スマートリモコン Nature Remo mini 2 ネイチャーリモミニ2 Remo-2W2 Alexa/Google Home/Siri対応
本記事で行うこと
v-0.1.0のブランチとします。
github.com作成したWebサイトのイメージ


作成したWebサイトのポイント
モチベーション
Nature Remoとは
概要
余談
Nature Remo mini 2を購入しましたが、Nature Remo 3の方がセンサーの種類が多いのでそちらも欲しいです。Nature Remo mini 2でしか動作確認しておりませんが、APIを叩いているのでAPI対応していればどのNature Remoでも動作するとお思います。Nature Remo mini 2とNature Remo 3製品を載せておきます。


Nature RemoのAPI
概要
- Nature RemoはAPIを使って操作することができます。
- APIの仕様は以下の公式ページから参照できます。
https://developer.nature.global/ - またAPI操作に必要なTokenは以下のページから取得可能です。
https://home.nature.global/ - このTokenが流出してしまうと自宅の家電が操作されてしまいますので、間違えてgithubにあげないようにう注意が必要です。
- (誤って流出してしまった場合は、上記のTokenページから削除するのが良いです。)
- 具体的な操作方法はpython codeのセクションで少し解説してみたいと思います。
余談
- API送信したあと、どうやって自宅のNature Remoに命令を出しているのかと疑問でしたが、Nature Remoの中の人が解説していたので以下の資料を見ると面白いです。
Nature Remoの裏側 ~ AWSとWeb技術をIoTの世界でフル活用する / Inside Nature Remo - Speaker Deck - 簡単にいうと
WebSocketという技術を使い、API送信先の環境の更新を検知して操作しているようです。 WebSocketについて体感してみたい人は以下の記事を見てみてください。
n-guitar.hatenablog.com
(こういう仕組みを考えている時って楽しいですよね。)
作成したWebサイトの利用方法
- Codeの解説の前に先に作成したWebサイトの利用方法を記載しておこうと思います。
- ※githubのREADMEを内容は同じです。
dockerでの起動
- docker/docker-compose環境があれば以下のように
REMO_TOKENにhttps://home.nature.global/で取得したTokenを設定して、起動でOKです。 - git clone
$ git clone https://github.com/n-guitar/flask-natuer-remo.git
- docker-compose.yml
version: "3"
services:
    web:
        build: .
        environment:
            - REMO_TOKEN=your_token
        ports:
            - 5000:5000
- start container
$ docker-compose up -d
この状態でブラウザでhttp://127.0.0.1:5000/に接続。
Pythonでの起動
- Pythonで起動する場合は以下のようにします。
※以下の例ではvenv環境を使っています。 - git clone
$ git clone https://github.com/n-guitar/flask-natuer-remo.git
- venv & module install
$ python -m venv env
$ source ./env/bin/activate
$ pip install -r requirements.txt
$ export REMO_TOKEN="your_token"
$ cd src
$ python main.py
テスト済み環境
- 2021/3/8時点のテスト済み環境は以下になります。
Python 3.9
Flask 1.1
requests 2.25
※必要に応じて、更新します。
python部分
- では今回のcode部分について解説してみたいと思います。
Nature RemoのAPI操作
api/remoclient.pyがNature RemoのAPIを操作するobjectとなります。- 結局、https://swagger.nature.global/ の内容をpythonで操作しているだけなので、解説はさらっと見るくらいでOKです。
api/remoclient.py
import os
import requests
import json


class NatureRemoClient(object):
    def __init__(self, base_url=None):
        if base_url:
            self.base_url = base_url
        else:
            self.base_url = 'https://api.nature.global'
        token = os.environ.get('REMO_TOKEN')
        if not token:
            raise Exception('Please set your API token to REMO_TOKEN')
        self.headers = {
            'accept': 'application/json',
            'Authorization': 'Bearer ' + token
        }

    def call_api(self, url, method='get', params=None):
        req_method = getattr(requests, method)
        try:
            res = req_method(self.base_url+url,
                             headers=self.headers,
                             params=params)
            return res.json()
        except Exception as e:
            raise Exception('Failed to call API: %s' % str(e))

    def get_appliances(self):
        url = '/1/appliances'
        return self.call_api(url)

    def send_signal(self, signal_id):
        url = '/1/signals/' + signal_id + '/send'
        return self.call_api(url, method='post')

    def send_aircon_settings(self, appliance_id, temperature=None, operation_mode=None, air_volume=None, air_direction=None, button=None):
        url = '/1/appliances/' + appliance_id + '/aircon_settings'
        print(url)
        params = {
            "temperature": temperature,
            "operation_mode": operation_mode,
            "air_volume": air_volume,
            "air_direction": air_direction,
            "button": button
        }
        print(params)
        return self.call_api(url, method='post', params=params)

    def send_tv(self, appliance_id, button):
        url = '/1/appliances/' + appliance_id + '/tv'
        print(url)
        params = {
            "button": button
        }
        print(params)
        return self.call_api(url, method='post', params=params)
def init
token = os.environ.get('REMO_TOKEN')でOS上の環境変数を取得し、headersのAuthorizationにBearer Tokenを入れてAPIの雛形を作ります。(ちなみにBearerの後の半角スペースがないとNGです)- APIは
https://api.nature.global/hogeというのが基本で、hoge部分にそれぞれ対応したAPI部分になります。
def call_api
- APIコールする関数で、url, method, paramsを引数として実行します。
- paramsにはどのボタンを実行するか、エアコンの温度を何度にするかなどををJson形式で引き渡します。
- 基本的に情報取得は
getで家電の操作系はsendmethodを引き渡すことになります。
def get_appliances
https://api.nature.global/1/appliancesを実行。- このAPIを実行すると、登録されている家電の情報が全て取得可能です。
- 後のJsonファイルの操作セクションで説明しますが、このAPIで取得した情報を使って、操作画面を生成することで、余計なAPI送信をしないようにします。
def send_signal
https://api.nature.global/1/signals/signal_id/sendを実行。- Nature Remoに個別で登録した家電を操作するAPIになります。
- 個別で登録した家電は登録したボタン毎に
signal_idが紐付きます。 - 登録した家電に一意に紐付く
appliance_idは使いません。 - 正直、次に解説する
send_aircon_settingsと同じく、appliance_idをAPIのURLにして、paramsにsignal_idをセットする仕様の方がよかった気がしなくもないです。
def send_aircon_settings
https://api.nature.global//1/appliances/appliance_id/aircon_settingsを実行。appliance_idには登録したエアコンのIDをセットします。- paramsに以下のように値をセットすることでエアコンの操作が可能です。
- 各パラメータは操作したい項目だけ引き渡してあげればOKです。例えば温度を変更したい場合は、
"temperature": 26,と行った感じになります。
params = {
            "temperature": temperature,
            "operation_mode": operation_mode,
            "air_volume": air_volume,
            "air_direction": air_direction,
            "button": button
        }
def send_tv
https://api.nature.global//1/appliances/appliance_id/tvを実行。appliance_idには登録したTVのIDをセットします。- TVはボタン毎にボタン名が紐ずくのでparamsには以下のように値をセットします。
params = {
            "button": button
        }
- ここまではAPI操作部分になります。
jsonファイルの操作
https://api.nature.global/1/appliancesで取得したjsonファイルの操作を行うobjectとなります。
import json

from api.remoclient import NatureRemoClient


class AppliancesDataClient(object):
    """
    save & load json
    json parse
    """

    def __init__(self, file_path=None):
        # json set
        if file_path:
            self.file_path = file_path
        else:
            self.file_path = "./remo_data/appliances.json"
        self.json_data = None

    def json_save(self):
        nclient = NatureRemoClient()
        appliances = nclient.get_appliances()
        try:
            with open(self.file_path, 'w') as outfile:
                json.dump(appliances, outfile, indent=4, ensure_ascii=False)
        except Exception as e:
            self.init_error = e

    def json_load(self):
        try:
            with open(self.file_path, "r") as json_file:
                self.json_data = json.load(json_file)
        except Exception as e:
            self.init_error = e

    def appliances_get_all(self):
        if self.json_data:
            return self.json_data
        else:
            return self.init_error

    def appliances_get_air(self, air_id=None):
        self.json_load() # load json, because update temperature
        if self.json_data:
            appliances_list = []
            for data in self.json_data:
                if data['type'] == "AC":
                    appliances_list.append(data)
            return appliances_list
        else:
            return self.init_error

    def appliances_json_update_air_temp(self, appliance_id, temperature):
        update_index = 0
        for i, appliance in enumerate(self.json_data):
            if appliance['id'] == appliance_id:
                update_index = i
        self.json_data[update_index]['settings']['temp'] = str(temperature)
        with open(self.file_path, 'w') as outfile:
            json.dump(self.json_data, outfile, indent=4, ensure_ascii=False)

    def appliances_get_other(self):
        if self.json_data:
            appliances_list = []
            for data in self.json_data:
                if data['type'] == "IR":
                    appliances_list.append(data)
            return appliances_list
        else:
            return self.init_error

    def appliances_get_tv(self):
        if self.json_data:
            appliances_list = []
            for data in self.json_data:
                if data['type'] == "TV":
                    appliances_list.append(data)
            return appliances_list
        else:
            return self.init_error
- ポイントだけ掻い摘むと、取得したjsonファイルは
"type": "TV",といったようにtype毎にTV,IR,ACのようにわかれるので、それぞれ対応するjson部分を取得します。 def appliances_json_update_air_tempでは画面上でエアコンの温度設定を変えた時にローカルに保存したjsonファイルを更新しています。update_indexはエアコンが複数存在する時にどのエアコンの温度を更新するかを判定しています。
Flaskのメイン部分
$ python main.pyで起動する時のメインになります。
main.py
import os

from flask import Flask, render_template, request

from api.json_dataclient import AppliancesDataClient
from air_controller import air_controller
from other_controller import other_controller
from tv_controller import tv_controller

app = Flask(__name__)
app.register_blueprint(air_controller)
app.register_blueprint(other_controller)
app.register_blueprint(tv_controller)

UPLOAD_FOLDER = './static/images/'
ALLOWED_EXTENSIONS = set(['.jpg','.jpeg'])
app.config['UPLOAD_FOLDER'] = UPLOAD_FOLDER
# limit upload file size : 5MB
app.config['MAX_CONTENT_LENGTH'] = 5 * 1024 * 1024
app.config.from_object(__name__)

@app.route('/')
def top():
    image_path = "./static/images"
    files = os.listdir(image_path)
    # If a file other than default.jpg exists, display image.jpg.
    if len(files) > 1:
        files.remove("default.jpg")
    image_list = list(map(lambda image: "images/" + image, files))
    return render_template('top.html', image_list=image_list)


@app.route('/air')
def air():
    appliances_air = appliances_client.appliances_get_air()
    return render_template('air.html', appliances_air=appliances_air)


@app.route('/tv')
def tv():
    appliances_tv = appliances_client.appliances_get_tv()
    return render_template('tv.html', appliances_tv=appliances_tv)


@app.route('/other')
def other():
    appliances_other = appliances_client.appliances_get_other()
    return render_template('other.html', appliances_other=appliances_other)


@app.route('/settings', methods=['GET', 'POST'])
def settings():
    if request.method == 'POST':
        img_file = request.files['img_file']
        print(img_file)
        _, ext = os.path.splitext(img_file.filename)
        ext = ext.lower()
        print(ext)
        if ext and ext in ALLOWED_EXTENSIONS:
            img_file.filename = "image.jpg"
            img_url = os.path.join(app.config['UPLOAD_FOLDER'], img_file.filename)
            img_file.save(img_url)
            appliances_get_all = appliances_client.appliances_get_all()
            return render_template('settings.html', appliances_get_all=appliances_get_all,result="Uploaded")
        else:
            appliances_get_all = appliances_client.appliances_get_all()
            return render_template('settings.html', appliances_get_all=appliances_get_all,result="Sony ... {} is not supported. Supports jpeg/jpg".format(ext))
    else:
        appliances_get_all = appliances_client.appliances_get_all()
        return render_template('settings.html', appliances_get_all=appliances_get_all)


if __name__ == "__main__":
    appliances_client = AppliancesDataClient()
    appliances_client.json_save()
    appliances_client.json_load()
    app.run(host='0.0.0.0', port=5000, debug=True)
register_blueprint
- 後述するBlueprintですが、Blueprintを使うとFlaskのURLを分割できます。
- 今回Nature RemoのAPI操作を受け付けるエンドポイントを分割しています。
def top
image_path = "./static/images"のディレクトリ配下にあるjpgファイルを表示します。default.jpgしかない場合は、default.jpgを表示するようにしていますが、これは完全に遊び機能です。
def air/tv/other
def settings
- settingsメニューでアップロードされたファイルを保存します。
- これも分割してもよかったかも・・・とこれを書きながら思ったので、次回のバージョンで分割するかもです。
main
FlaskのURL分割(Blueprint)
- Blueprintを使ってFlaskのURLを分割したものになります。
air_controller.py
from flask import Blueprint

from api.json_dataclient import AppliancesDataClient
from api.remoclient import NatureRemoClient

air_controller = Blueprint('air_controller', __name__, url_prefix='/air/api')


@air_controller.route('/send/power/<appliance_id>/<signal>', methods=['POST'])
def send_power(appliance_id,signal):
    nclient = NatureRemoClient()
    if signal == "power-on":
        signal = ""
    result = nclient.send_aircon_settings(appliance_id=appliance_id,button=signal)
    return result

@air_controller.route('/send/temp/<appliance_id>/<signal>', methods=['POST'])
def send_temp(appliance_id,signal):
    nclient = NatureRemoClient()
    result = nclient.send_aircon_settings(appliance_id=appliance_id,temperature=signal)
    # update json data
    appliances_client = AppliancesDataClient()
    appliances_client.json_load()
    appliances_client.appliances_json_update_air_temp(appliance_id=appliance_id, temperature=signal)
    return result

@air_controller.route('/send/mode/<appliance_id>/<signal>', methods=['POST'])
def send_mode(appliance_id,signal):
    nclient = NatureRemoClient()
    signal = signal[5:]
    result = nclient.send_aircon_settings(appliance_id=appliance_id,operation_mode=signal)
    return result

@air_controller.route('/send/vol/<appliance_id>/<signal>', methods=['POST'])
def send_vol(appliance_id,signal):
    nclient = NatureRemoClient()
    signal = signal[4:]
    result = nclient.send_aircon_settings(appliance_id=appliance_id,air_volume=signal)
    return result

@air_controller.route('/send/dir/<appliance_id>/<signal>', methods=['POST'])
def send_dir(appliance_id,signal):
    nclient = NatureRemoClient()
    signal = signal[4:]
    result = nclient.send_aircon_settings(appliance_id=appliance_id,air_direction=signal)
    return result
Blueprint
air_controller = Blueprint('air_controller', __name__, url_prefix='/air/api')と記述することで、ベースのエンドポイントを記述できます。- 例えば、
@air_controller.route('/send/dir/<appliance_id>/<signal>', methods=['POST'])となっていた場合は、/air/api/send/dir/<appliance_id>/<signal>がエンドポイントになります。
def send_power
- エアコン電源のon,offをおこないます。
- エアコン電源をonにするときは
button=""と空文字を送る仕様のため、条件を入れています。
def send_temp
- エアコンの温度を変更します。
- 画面上で変更した後は、jsで画面上も更新するのですが、リロードした時にローカルのjsonファイルをみてしまい、値が画面上は戻ってしまうのでローカルのjsonを更新しています。
def send_mode/vol/dir
- エアコン電源、温度以外のパラメータを更新します。
- volやdirは
autoの他に1や2といったパラメータを送る signal = signal[4:]、signal = signal[5:]としているのは、signalをhtmlのid属性からとってくるのですがid属性を一意にしたかったため、<dev class="signal" id="vol-1" >,<dev class="signal" id="dir-1" >,<dev class="signal" id="mode-warm" >と操作機能毎にvol-,dir-,mode-を余分につけている。その余分な部分を取り除いている。以下、
tv_controller.pyとother_controller.pyは上記と変わらないので割愛します。
tv_controller.py
from flask import Blueprint
from api.remoclient import NatureRemoClient

tv_controller = Blueprint('tv_controller', __name__, url_prefix='/tv/api')


@tv_controller.route('/send/<appliance_id>/<button_name>', methods=['POST'])
def send_tv(appliance_id,button_name):
    nclient = NatureRemoClient()
    result = nclient.send_tv(appliance_id=appliance_id,button=button_name)
    return result
other_controller.py
from flask import Blueprint
from api.remoclient import NatureRemoClient

other_controller = Blueprint('other_controller', __name__, url_prefix='/other/api')


@other_controller.route('/send_signal/<signal_id>', methods=['POST'])
def send_signal(signal_id):
    nclient = NatureRemoClient()
    result = nclient.send_signal(signal_id=signal_id)
    return result
HTML部分
base template
template/base.html
<!DOCTYPE html>
<html lang="ja">
    <head>
        <meta charset="UTF-8" />
        <meta http-equiv="X-UA-Compatible" content="IE=edge" />
        <meta name="viewport" content="width=device-width, initial-scale=1.0" />
        <title>Flask Nature Remo</title>
        <link
            rel="stylesheet"
            href="{{ url_for('static', filename='css/style.css' )}}"
        />
        <link
            rel="stylesheet"
            href="{{ url_for('static', filename='css/all.min.css' )}}"
        />

    </head>
    <body>
        <div class="navigation">
            <ul>
                <li>
                    <a href="{{ url_for('top') }}">
                        <span class="title">Flask Nature Remo</span>
                    </a>
                </li>
                <li>
                    <a href="{{ url_for('air') }}">
                        <span class="icon"><i class="fas fa-wind"></i></span>
                        <span class="title">AIR</span>
                    </a>
                </li>
                <li>
                    <a href="{{ url_for('tv') }}">
                        <span class="icon"><i class="fas fa-tv"></i></span>
                        <span class="title">TV</span>
                    </a>
                </li>
                <li>
                    <a href="{{ url_for('other') }}">
                        <span class="icon"><i class="fas fa-adjust"></i></span>
                        <span class="title">OTHER</span>
                    </a>
                </li>
                <li>
                    <a href="{{ url_for('settings') }}">
                        <span class="icon"><i class="fas fa-cog"></i></span>
                        <span class="title">SETTINGS</span>
                    </a>
                </li>
            </ul>
        </div>
        <div class="main_content">{% block content %} {% endblock %}</div>
        <div class="footer"></div>
    </body>
    <script type=text/javascript src="{{ url_for('static', filename='js/controller.js') }}"></script>
</html>
jinja tempaleでstatic
- Flaskでjinja tempaleと使いcssやjavascriptを読み込むときは
{{ url_for('static', filename='js/controller.js') }}とstatic部分にベースディレクトリ名、js/controller.jsに(ディレクトリ+)ファイル名として設定。
topメニュー
- 特に解説不要なので割愛しますが、先程の
base.htmlの{% block content %} {% endblock %}部分にコンテンツが差し込まれます。
template/top.html
{% extends "base.html" %} {% block content %}
<div class="menu-title">Top Manu</div>
<div class="menu-text">
</div>
<div class="image-frame">
    <ul class="top-images">
        {% for image in image_list %}
            <li class="image">
                <img src="{{ url_for('static', filename=image )}}" />
            </li>
        {% endfor %}
    </ul>
</div>

{% endblock %}
エアコンメニュー
template/air.html
{% extends "base.html" %}
{% block content %}
<div class="menu-title">
AIR Manu
</div>
<div class="menu-text">
</div>
<div class="air-manu-main">
<div class="select">
<ul>
{% for appliance in appliances_air %}
{# Set 0th to activate #}
{% if loop.index0 == 0 %}
<li class="list active" select-filter="id-{{ appliance['id'] }}">{{ appliance['nickname'] }}</li>
{% else %}
<li class="list" select-filter="id-{{ appliance['id'] }}">{{ appliance['nickname'] }}</li>
{% endif %}
{% endfor %}
</ul>
</div>
<div class="air-product">
{% for appliance in appliances_air %}
{# Set 0th to activate #}
{% if loop.index0 == 0 %}
<div class="btnBox air power id-{{ appliance['id'] }} active">
power
<div class="airbtn">
<i class="fas fa-power-off">
<dev class="signal" id="power-on" > on </dev>
</i>
</div>
<div class="airbtn">
<i class="fas fa-power-off">
<dev class="signal" id="power-off" > off</dev>
</i>
</div>
</div>
<div class="btnBox air temperature id-{{ appliance['id'] }} active">
temperature
<div class="airbtn temp-up">
<i class="fas fa-angle-up">
<dev class="signal" id="temp-up" ></dev>
</i>
</div>
<div class="airbtn temp-num">
<dev class="signal" id="temp-num" >{{appliance['settings']['temp']}}</dev>
</div>
<div class="airbtn temp-down">
<i class="fas fa-angle-down">
<dev class="signal" id="temp-down" ></dev>
</i>
</div>
</div>
<div class="btnBox air mode id-{{ appliance['id'] }} active">
mode
<div class="airbtn">
<i class="fas fa-car">
<dev class="signal" id="mode-auto" > auto</dev>
</i>
</div>
<div class="airbtn">
<i class="fas fa-wind">
<dev class="signal" id="mode-blow" > blow</dev>
</i>
</div>
<div class="airbtn">
<i class="fas fa-snowflake">
<dev class="signal" id="mode-cool" > cool</dev>
</i>
</div>
<div class="airbtn">
<i class="fas fa-tint-slash">
<dev class="signal" id="mode-dry" > dry</dev>
</i>
</div>
<div class="airbtn">
<i class="fas fa-burn">
<dev class="signal" id="mode-warm" > warm</dev>
</i>
</div>
</div>
<div class="btnBox air vol id-{{ appliance['id'] }} active">
air volume
<div class="airbtn">
<i class="fas fa-fan">
<dev class="signal" id="vol-auto" > auto</dev>
</i>
</div>
<div class="airbtn">
<i class="fas fa-fan">
<dev class="signal" id="vol-1" > 1</dev>
</i>
</div>
<div class="airbtn">
<i class="fas fa-fan">
<dev class="signal" id="vol-2" > 2</dev>
</i>
</div>
<div class="airbtn">
<i class="fas fa-fan">
<dev class="signal" id="vol-3" > 3</dev>
</i>
</div>
<div class="airbtn">
<i class="fas fa-fan">
<dev class="signal" id="vol-4" > 4</dev>
</i>
</div>
<div class="airbtn">
<i class="fas fa-fan">
<dev class="signal" id="vol-5" > 5</dev>
</i>
</div>
<div class="airbtn">
<i class="fas fa-fan">
<dev class="signal" id="vol-6" > 6</dev>
</i>
</div>
</div>
<div class="btnBox air dir id-{{ appliance['id'] }} active">
direction
<div class="airbtn">
<i class="fas fa-paper-plane">
<dev class="signal" id="dir-auto" > auto</dev>
</i>
</div>
<div class="airbtn">
<i class="fas fa-paper-plane">
<dev class="signal" id="dir-swing" > swing</dev>
</i>
</div>
<div class="airbtn">
<i class="fas fa-paper-plane">
<dev class="signal" id="dir-1" > 1</dev>
</i>
</div>
<div class="airbtn">
<i class="fas fa-paper-plane">
<dev class="signal" id="dir-2" > 2</dev>
</i>
</div>
<div class="airbtn">
<i class="fas fa-paper-plane">
<dev class="signal" id="dir-3" > 3</dev>
</i>
</div>
<div class="airbtn">
<i class="fas fa-paper-plane">
<dev class="signal" id="dir-4" > 4</dev>
</i>
</div>
<div class="airbtn">
<i class="fas fa-paper-plane">
<dev class="signal" id="dir-5" > 5</dev>
</i>
</div>
</div>
<div class="btnBox air id-{{ appliance['id'] }} active">
<p><i class="fas fa-thermometer-half"></i></p>
<p class="signal"></p>
</div>
{% else %}
<div class="btnBox air power id-{{ appliance['id'] }}">
power
<div class="airbtn">
<i class="fas fa-power-off">
<dev class="signal" id="power-on" > on </dev>
</i>
</div>
<div class="airbtn">
<i class="fas fa-power-off">
<dev class="signal" id="power-off" > off</dev>
</i>
</div>
</div>
<div class="btnBox air temperature id-{{ appliance['id'] }}">
temperature
<div class="airbtn temp-up">
<i class="fas fa-angle-up">
<dev class="signal" id="temp-up" ></dev>
</i>
</div>
<div class="airbtn temp-num">
<dev class="signal" id="temp-num" >{{appliance['settings']['temp']}}</dev>
</div>
<div class="airbtn temp-down">
<i class="fas fa-angle-down">
<dev class="signal" id="temp-down" ></dev>
</i>
</div>
</div>
<div class="btnBox air mode id-{{ appliance['id'] }}">
mode
<div class="airbtn">
<i class="fas fa-car">
<dev class="signal" id="mode-auto" > auto</dev>
</i>
</div>
<div class="airbtn">
<i class="fas fa-wind">
<dev class="signal" id="mode-blow" > blow</dev>
</i>
</div>
<div class="airbtn">
<i class="fas fa-snowflake">
<dev class="signal" id="mode-cool" > cool</dev>
</i>
</div>
<div class="airbtn">
<i class="fas fa-tint-slash">
<dev class="signal" id="mode-dry" > dry</dev>
</i>
</div>
<div class="airbtn">
<i class="fas fa-burn">
<dev class="signal" id="mode-warm" > warm</dev>
</i>
</div>
</div>
<div class="btnBox air vol id-{{ appliance['id'] }}">
air volume
<div class="airbtn">
<i class="fas fa-fan">
<dev class="signal" id="vol-auto" > auto</dev>
</i>
</div>
<div class="airbtn">
<i class="fas fa-fan">
<dev class="signal" id="vol-1" > 1</dev>
</i>
</div>
<div class="airbtn">
<i class="fas fa-fan">
<dev class="signal" id="vol-2" > 2</dev>
</i>
</div>
<div class="airbtn">
<i class="fas fa-fan">
<dev class="signal" id="vol-3" > 3</dev>
</i>
</div>
<div class="airbtn">
<i class="fas fa-fan">
<dev class="signal" id="vol-4" > 4</dev>
</i>
</div>
<div class="airbtn">
<i class="fas fa-fan">
<dev class="signal" id="vol-5" > 5</dev>
</i>
</div>
<div class="airbtn">
<i class="fas fa-fan">
<dev class="signal" id="vol-6" > 6</dev>
</i>
</div>
</div>
<div class="btnBox air dir id-{{ appliance['id'] }}">
direction
<div class="airbtn">
<i class="fas fa-paper-plane">
<dev class="signal" id="dir-auto" > auto</dev>
</i>
</div>
<div class="airbtn">
<i class="fas fa-paper-plane">
<dev class="signal" id="dir-swing" > swing</dev>
</i>
</div>
<div class="airbtn">
<i class="fas fa-paper-plane">
<dev class="signal" id="dir-1" > 1</dev>
</i>
</div>
<div class="airbtn">
<i class="fas fa-paper-plane">
<dev class="signal" id="dir-2" > 2</dev>
</i>
</div>
<div class="airbtn">
<i class="fas fa-paper-plane">
<dev class="signal" id="dir-3" > 3</dev>
</i>
</div>
<div class="airbtn">
<i class="fas fa-paper-plane">
<dev class="signal" id="dir-4" > 4</dev>
</i>
</div>
<div class="airbtn">
<i class="fas fa-paper-plane">
<dev class="signal" id="dir-5" > 5</dev>
</i>
</div>
</div>
<div class="btnBox air id-{{ appliance['id'] }}">
<p><i class="fas fa-thermometer-half"></i></p>
<p class="signal"></p>
</div>
{% endif %}
{% endfor %}
</div>
<div id="sendingWrap">
<div class="sendind-text">sending signal ... </div>
<div id="sending"></div>
</div>
</div>
{% endblock %}
- classにactiveが付与されている部分だけcssで表示するように制御している。
{% if loop.index0 == 0 %}としているのはエアコンが複数存在した時に、一番初めのエアコンだけactiveを付与するように制御している。select-filter="id-{{ appliance['id'] }}"は画面上で選択したエアコンに対応するボタンを表示するように制御している。- わざわざ
appliance['id']にid-をつけているのは、appliance['id']が数字から始まるものがあり、cssで動作しないためこうした。(実際はcss側でエスケープしてもよかった気がする) - 各エアコンのボタンはhtmlにベタ書きしてしまっているため、他のエアコンで動作確認はできていない。
- 動的にボタンを生成することは可能だが見た目を考慮したためエアコンメニューはこうしてみた。
- 動的にボタンを生成しているのはこの次のTVメニューと、OTHERメニューになる。
TVメニュー
template/tv.html
{% extends "base.html" %}
{% block content %}
<div class="menu-title">TV Manu</div>
<div class="menu-text">
</div>
<div class="tv-manu-main">
<div class="select">
<ul>
{% for appliance in appliances_tv %}
{# Set 0th to activate #}
{% if loop.index0 == 0 %}
<li class="list active" select-filter="id-{{ appliance['id'] }}">{{ appliance['nickname'] }}</li>
{% else %}
<li class="list" select-filter="id-{{ appliance['id'] }}">{{ appliance['nickname'] }}</li>
{% endif %}
{% endfor %}
</ul>
</div>
<div class="tv-product">
{% for appliance in appliances_tv %}
{# Set 0th to activate #}
{% if loop.index0 == 0 %}
{% for button in appliance['tv']['buttons'] %}
<div class="btnBox tv id-{{ appliance['id'] }} active">
<i class="fas fa-bolt">
<dev class="signal" id="{{ button['name'] }}"> {{ button['name'] }}</dev>
</i>
</div>
{% endfor %}
{% else %}
{% for button in appliance['tv']['buttons'] %}
<div class="btnBox tv id-{{ appliance['id'] }}">
<i class="fas fa-bolt">
<dev class="signal" id="{{ button['name'] }}"> {{ button['name'] }}</dev>
</i>
</div>
{% endfor %}
{% endif %}
{% endfor %}
</div>
<div id="sendingWrap">
<div class="sendind-text">sending signal ... </div>
<div id="sending"></div>
</div>
</div>
{% endblock %}
- TVはsignalが
{{ button['name'] }}となる。 - ボタンは存在するだけ、動的に生成する。
OTHERメニュー
template/other.html
{% extends "base.html" %}
{% block content %}
<div class="menu-title">Other Manu</div>
<div class="menu-text">
</div>
<div class="other-manu-main">
<div class="select">
<ul>
{% for appliance in appliances_other %}
{# Set 0th to activate #}
{% if loop.index0 == 0 %}
<li class="list active" select-filter="id-{{ appliance['id'] }}">{{ appliance['nickname'] }}</li>
{% else %}
<li class="list" select-filter="id-{{ appliance['id'] }}">{{ appliance['nickname'] }}</li>
{% endif %}
{% endfor %}
</ul>
</div>
<div class="other-product">
{% for appliance in appliances_other %}
{# Set 0th to activate #}
{% if loop.index0 == 0 %}
{% for signal in appliance['signals'] %}
<div class="btnBox other id-{{ appliance['id'] }} active">
<i class="fas fa-bolt">
<dev class="signal" id="id-{{ signal['id'] }}"> {{ signal['name'] }}</dev>
</i>
</div>
{% endfor %}
{% else %}
{% for signal in appliance['signals'] %}
<div class="btnBox other id-{{ appliance['id'] }}">
<i class="fas fa-bolt">
<dev class="signal" id="id-{{ signal['id'] }}"> {{ signal['name'] }}</dev>
</i>
</div>
{% endfor %}
{% endif %}
{% endfor %}
</div>
<div id="sendingWrap">
<div class="sendind-text">sending signal ... </div>
<div id="sending"></div>
</div>
</div>
{% endblock %}
SETTINGSメニュー
- OTHER(IR)はsignalが
signal['id']となる。 - TVと同じくボタンは存在するだけ、動的に生成する。
template/settings.html
{% extends "base.html" %}
{% block content %}
<div class="menu-title">
    SETTINGS Manu
</div>
<div class="menu-text">
    {{ test }}
</div>
<div class="settings-manu-main">
    <p>Nature Remo</p>
    <table class="appliance_table">
        <thead>
            <tr>
                <th>id</th>
                <th>name</th>
                <th>serial_number</th>
                <th>firmware_version</th>
            </tr>
        </thead>
            <tr>
                <td>{{ appliances_get_all[0]['device']['id'] }}</td>
                <td>{{ appliances_get_all[0]['device']['name'] }}</td>
                <td>{{ appliances_get_all[0]['device']['serial_number'] }}</td>
                <td>{{ appliances_get_all[0]['device']['firmware_version'] }}</td>
            </tr>
    </table>
    <p>AIR</p>
    <table class="appliance_table">
            <thead>
                <tr>
                    <th>appliance_id</th>
                    <th>type</th>
                    <th>nickname</th>
                    <th>model_name</th>
                </tr>
            </thead>
        {% for appliance in appliances_get_all %}
            {% if appliance['type'] == 'AC' %}
                <tr>
                    <td>{{ appliance['id'] }}</td>
                    <td>{{ appliance['type'] }}</td>
                    <td>{{ appliance['nickname'] }}</td>
                    <td>{{ appliance['model']['name'] }}</td>
                </tr>
            {% endif %}
        {% endfor %}
    </table>
    <p>TV</p>
    <table class="appliance_table">
            <thead>
                <tr>
                    <th>appliance_id</th>
                    <th>type</th>
                    <th>nickname</th>
                    <th>model_name</th>
                </tr>
            </thead>
        {% for appliance in appliances_get_all %}
            {% if appliance['type'] == 'TV' %}
                <tr>
                    <td>{{ appliance['id'] }}</td>
                    <td>{{ appliance['type'] }}</td>
                    <td>{{ appliance['nickname'] }}</td>
                    <td>{{ appliance['model']['name'] }}</td>
                </tr>
            {% endif %}
        {% endfor %}
    </table>
    <p>OTHER</p>
    <table class="appliance_table">
            <thead>
                <tr>
                    <th>appliance_id</th>
                    <th>type</th>
                    <th>nickname</th>
                </tr>
            </thead>
        {% for appliance in appliances_get_all %}
            {% if appliance['type'] == 'IR' %}
                <tr>
                    <td>{{ appliance['id'] }}</td>
                    <td>{{ appliance['type'] }}</td>
                    <td>{{ appliance['nickname'] }}</td>
                </tr>
            {% endif %}
        {% endfor %}
    </table>
    <div class="image-upload">
        <p>Top Image Upload </p>
        <p>Only jpg File & Max Size 5MB</p>
        <form action="{{ url_for('settings') }}" method=post enctype="multipart/form-data">
              <input type=file id="img_file" name=img_file>
              <input type=submit value=save>
        </form>
        {% if result %}
            <p>{{ result }}</p>
        {% endif %}
    </div>
</div>
{% endblock %}
- 登録されている機器とNature Remoの情報を表示するようにした。
- topページの画像を変更できる画像アプロードformを作成している。
CSS(SCSS)部分
@import url("https://fonts.googleapis.com/css2?family=M+PLUS+Rounded+1c:wght@700&display=swap");

$cBaseColor: #eaeaea;
$cBaseColorHover: #d3f7ff;
$cBaseTextColor: #3c5082;
$cSelectActiveMenu: #d0cece;
$cActiveButtonBorder: #fff;
$cSendingCircle: #d3f7ff;

body {
    margin: 0;
    min-height: 100vh;
    font-family: "M PLUS Rounded 1c", sans-serif;
}

.navigation {
    position: fixed;
    background: $cBaseColor;
    width: 180px;
    height: 100%;
    & ul {
        position: absolute;
        margin-top: 40px;
        padding: 0;
        width: 100%;
        & li {
            position: relative;
            width: 100%;
            list-style: none;
            &:hover {
                background: $cBaseColorHover;
            }
            & a {
                position: relative;
                display: block;
                width: 100%;
                display: flex;
                text-decoration: none;
                color: $cBaseTextColor;
                & .icon {
                    position: relative;
                    display: block;
                    min-width: 60px;
                    height: 60px;
                    line-height: 60px;
                    text-align: center;
                    & .fas {
                        font-size: 24px;
                    }
                }
                & .title {
                    position: relative;
                    display: block;
                    padding: 0 10px;
                    height: 60px;
                    line-height: 60px;
                    text-align: start;
                    white-space: nowrap;
                }
            }
        }
    }
}

.menu-title {
    color: $cBaseTextColor;
}

.main_content {
    margin-left: 180px;
    padding: 42px;
    & .menu-title {
        text-align: center;
    }
}

.image-frame {
    margin-top: 60px;
    & > ul.top-images {
        list-style: none;
        position: relative;
        padding: 0;
        & > li {
            position: absolute;
            overflow: hidden;
            & > img {
                width: 100%;
                height: 100%;
            }
        }
    }
}

.air-manu-main .select,
.tv-manu-main .select,
.other-manu-main .select {
    padding: 20px;
    & ul {
        display: flex;
        flex-wrap: wrap;
        margin-bottom: 10px;
        & li {
            list-style: none;
            background: $cBaseColor;
            padding: 8px 20px;
            margin: 5px;
            letter-spacing: 1px;
            color: $cBaseTextColor;
            cursor: pointer;
            &.active {
                background: $cSelectActiveMenu;
            }
            &:hover {
                background: $cBaseColorHover;
                cursor: pointer;
            }
        }
    }
}

.tv-product,
.other-product {
    display: flex;
    flex-wrap: wrap;
    & > .btnBox {
        width: 0px;
        margin: 0px;
        padding: 0px;
        transition: 0.3s;
        opacity: 0;
        &.active {
            min-width: 180px;
            margin: 5px;
            padding: 5px;
            font-size: 20px;
            background: $cBaseColor;
            place-items: center;
            text-align: center;
            border-style: solid;
            border-color: $cActiveButtonBorder;
            color: $cBaseTextColor;
            opacity: 1;
            &:hover {
                background: $cBaseColorHover;
                cursor: pointer;
            }
        }
    }
}

.air-product {
    display: flex;
    flex-wrap: wrap;
    align-items: flex-start;
    & > .btnBox {
        width: 0px;
        margin: 0px;
        padding: 0px;
        transition: 0.3s;
        opacity: 0;
        &.power.active {
            min-width: 180px;
            margin: 5px;
            padding: 5px;
            font-size: 20px;
            border-style: solid;
            border-color: $cActiveButtonBorder;
            color: $cBaseTextColor;
            text-align: center;
            opacity: 1;
            & > .airbtn {
                background: $cBaseColor;
                padding: 5px;
                border-style: solid;
                border-color: $cActiveButtonBorder;
            }
        }
        &.temperature.active {
            min-width: 180px;
            margin: 5px;
            padding: 5px;
            font-size: 20px;
            border-style: solid;
            border-color: $cActiveButtonBorder;
            color: $cBaseTextColor;
            text-align: center;
            opacity: 1;
            & > .airbtn {
                background: $cBaseColor;
                padding: 5px;
                border-style: solid;
                border-color: $cActiveButtonBorder;
            }
            & > .temp-num {
                background: $cActiveButtonBorder;
            }
        }
        &.mode.active {
            min-width: 180px;
            margin: 5px;
            padding: 5px;
            font-size: 20px;
            border-style: solid;
            border-color: $cActiveButtonBorder;
            color: $cBaseTextColor;
            text-align: center;
            opacity: 1;
            & > .airbtn {
                background: $cBaseColor;
                padding: 5px;
                border-style: solid;
                border-color: $cActiveButtonBorder;
            }
        }
        &.vol.active {
            min-width: 180px;
            margin: 5px;
            padding: 5px;
            font-size: 20px;
            border-style: solid;
            border-color: $cActiveButtonBorder;
            color: $cBaseTextColor;
            text-align: center;
            opacity: 1;
            & > .airbtn {
                background: $cBaseColor;
                padding: 5px;
                border-style: solid;
                border-color: $cActiveButtonBorder;
            }
        }
        &.dir.active {
            min-width: 180px;
            margin: 5px;
            padding: 5px;
            font-size: 20px;
            border-style: solid;
            border-color: $cActiveButtonBorder;
            color: $cBaseTextColor;
            text-align: center;
            opacity: 1;
            & > .airbtn {
                background: $cBaseColor;
                padding: 5px;
                border-style: solid;
                border-color: $cActiveButtonBorder;
            }
        }
        &.active {
            & > .airbtn:hover {
                background: $cBaseColorHover;
                cursor: pointer;
            }
        }
    }
}

.settings-manu-main {
    color: $cBaseTextColor;
}

.appliance_table {
    & > thead {
        background-color: $cBaseColor;
    }
    & > tbody > tr {
        text-align: center;
        &:hover {
            background-color: $cBaseColorHover;
        }
    }
}

.image-upload {
    margin-top: 20px;
    & > form > input {
        font-size: 15px;
        font-family: auto;
    }
}

#sendingWrap {
    position: fixed;
    right: 3%;
    bottom: 3%;
    display: flex;
    opacity: 0;
    &.active {
        opacity: 1;
    }
}

/* sending anime */
#sending {
    width: 10px;
    height: 10px;
    border-radius: 50%;
    border: 5px solid $cSendingCircle;
    border-right-color: transparent;
    animation: sendAnime 1s linear infinite;
    opacity: 1;
}
@keyframes sendAnime {
    0% {
        transform: rotate(0deg);
    }
    50% {
        transform: rotate(180deg);
    }
    100% {
        transform: rotate(360deg);
    }
}
- 画面の色合いは変数にしているため、変更すれば好みの色にすることができる。
@import url("https://fonts.googleapis.com/・・・は好みのフォントを以下のサイトから取得しcssにinportすることで使えるようになる。
Google Fonts- active属性が付与されたボタンだけ表示したいため、active属性には
opacity: 1;として制御している。 sending animeはボタン押下時に、裏でjsがAPIを送信し、処理が帰ってくるまでの間右下に表示する部分。以下のような表示がでるようにした。

Javascript部分
static/js/controller.js
// select manu controller
const select_products = document.querySelectorAll(".list");
const click_or_ontouch = window.ontouchstart ? 'touchstart' : 'click';
console.log(click_or_ontouch)

select_products.forEach((el, i) => {
    el.addEventListener(click_or_ontouch, () => {
        selected = el.getAttribute("select-filter");
        el.classList.add("active");

        // Delete active class for the button that was pressed.
        select_products.forEach((v, k) => {
            if (i == k) {
                //pass
                ;
            } else {
                select_products[k].classList.remove("active");
                console.log("info:remove active class:");
            }
        });
        // Inactive all button. remove active class.
        const select_btns = document.querySelectorAll(".btnBox");
        select_btns.forEach((v, k) => {
            select_btns[k].classList.remove("active");
            console.log("info:.btnBox all remove active class:");
        });
        // Activate the button corresponding to the button you pressed.
        const active_btn = ".btnBox." + selected;
        const active_btns = document.querySelectorAll(active_btn);
        active_btns.forEach((v, k) => {
            active_btns[k].classList.add("active");
            console.log("info:select .btnBox add active class:");
        });
    });
});

// sending anime controller
const sending_anime = (status) => {
    const sendingwrap = document.querySelector("#sendingWrap");
    if (status == "sending") {
        sendingwrap.classList.add("active");
    } else if(status == "done") {
        sendingwrap.classList.remove("active");
    }
};

// send api
const signal_fetch = async (url, appliance_id, signal) => {
    sending_anime("sending");
    if (url.match(/other/)) {
        // other appliance
        signal_id = signal
        fetch_url = url + "/" + signal_id;
    } else {
        // tv air appliance
        fetch_url = url + "/" + appliance_id + "/" + signal;
    }
    await fetch(fetch_url, {
        method: "POST",
    })
        .then((response) => response.text())
        .then((text) => {
            console.log(text);
            sending_anime("done");
        });
};

// click button action
const click_btn_action = (target_btn_class_name, action_url) => {
    let action_btn = document.querySelectorAll(target_btn_class_name);
    action_btn.forEach((el, i) => {
        el.addEventListener(click_or_ontouch, () => {
            appliance_id = document
                .querySelector(".list.active")
                .getAttribute("select-filter");
            appliance_id = appliance_id.slice(3);
            signal = el.querySelector(".signal").id;
            // other appliance
            if (target_btn_class_name.match(/other/)) {
                signal = signal.slice(3);
            }
            console.log("click:", appliance_id, signal);
            signal_fetch(
                (url = action_url),
                (appliance_id = appliance_id),
                (signal = signal)
            );
        });
    });
};

// click button action instance
// air
click_btn_action(target_btn_class_name=".power > .airbtn",action_url="/air/api/send/power")
click_btn_action(target_btn_class_name=".mode > .airbtn",action_url="/air/api/send/mode")
click_btn_action(target_btn_class_name=".vol > .airbtn",action_url="/air/api/send/vol")
click_btn_action(target_btn_class_name=".dir > .airbtn",action_url="/air/api/send/dir")
// tv
click_btn_action(target_btn_class_name=".btnBox.tv",action_url="/tv/api/send")
// other
click_btn_action(target_btn_class_name=".btnBox.other",action_url="/other/api/send_signal")


const air_temp_btns = document.querySelectorAll(".temperature > .airbtn");
air_temp_btns.forEach((el, i) => {
    // console.log(el);
    el.addEventListener(click_or_ontouch, (e) => {
        appliance_id = document
            .querySelector(".list.active")
            .getAttribute("select-filter");
        appliance_id = appliance_id.slice(3);
        signal = el.querySelector(".signal").id;
        temp_num_aria = document.querySelector(
            ".temperature > .airbtn > .signal"
        );
        temp_num = temp_num_aria.innerText;
        if (signal == "temp-up") {
            if (Number(temp_num) < 30.0) {
                temp_num = Number(temp_num) + 0.5;
                temp_num_aria.textContent = temp_num;
            }
        } else if (signal == "temp-down") {
            if (Number(temp_num) > 18.0) {
                temp_num = Number(temp_num) - 0.5;
                temp_num_aria.textContent = temp_num;
            }
        }
        console.log("click:", appliance_id, signal, temp_num);
        signal_fetch(
            (url = "/air/api/send/temp"),
            (appliance_id = appliance_id),
            (signal = temp_num)
        );
    });
});
activeボタンの切り替え(select manu controller)
- 複数機器がある場合、選択した機器のclassにactiveを付与し、他の機器のactiveを削除する機能を持つ。
- jQueryを使うともっと簡単にできるのだが、意地でも使いたくないという気持ちからこうなった。
Fetchによる非同期処理(send api, click button action)
- APIをボタンが押下された時に送信する機能。
click button action(click_btn_action関数)でボタンが押下されたイベントをが来たらsend api(signal_fetch関数)にurlとappliance_idとsignalを引き渡して実行する。click button action(click_btn_action関数)はclick button action instance部分でそれぞれ対応したメニューのボタンのアクションを生成している。send api(signal_fetch関数)はfetchを使い非同期でapiを送信する。- これもjQueryを使うと簡単にできるのだが、意地でも使いたくないという気持ちからこうなった。
send時のanime(sending anime controller)
send api(signal_fetch関数)から呼ばれ、sending animeの表示をコントロールしている。- 仕組みは activeボタンの切り替と同じで、activeの追加・削除を行っている。
タッチスクリーン(スマホ)対応
- 手元のiPadから使うシーンもあったが、タッチした時の反応が悪かったのでタッチスクリーン対応した。
const click_or_ontouch = window.ontouchstart ? 'touchstart' : 'click';の部分でイベントを判定している。
後書き
- これを作ってから3/12時点で1ヶ月くらいたったが、仕事中はほぼ毎日のように利用しているので、使い勝手は満足している。
- なんとなくpythonで作るより、正直Reactとかで作った方が早かったんじゃないか説はあるが、pythonの勉強を兼ねてたのでまぁよかったかなと思った。
- 普段Bootstrapで見た目を整えてしまうのだが、(
多分誰も使わない)OSSとして公開したかったのでcssを自作してみたけど、webの見た目部分がどのようにcssで表現されているか学ぶことができてとてもよかった。 - cssの楽しみを知ったのでダークモード対応とかしてみたいと思った。
- 普段の仕事はインフラエンジニア(OS,SV,DBなどの基盤全般)なので、今回みたいにフロントやサーバサイドを週末いっぱい書こうと思います。
【WebSocket】uvicorn0.13.4を利用してweb chatを作成して、room毎のchatを実現する。(sample codeはgithubで公開)

- 本記事で行うこと
- モチベーション
- 環境
- sample code
- 参考サイト
- 環境構築
- 簡単なechoサーバの例
- scopeの中身を覗いてみる
- scopeのheaderをparseする
- WebSocket Serverのclassを作り汎用化する
- echoをweb画面に表示する。
- WebSocket Clientにブロードキャストする
- chet room毎にブロードキャストする
- 後書き
本記事で行うこと
- uvicorn0.13.4を利用し、web chatを作成する。
- web chatはroom毎にchet可能とし、例えばroom1のchat内容がroom2に表示されないようにする。
モチベーション
- WebSocketを利用したアプリケーション作成するため、簡単な例を作成したかったため。
- 社内のPythonの勉強会での説明用に利用したかったため。
- ASGIの仕様把握したいため。
環境
- python3.9.1
- macbook air M1
$ sw_vers
ProductName:    macOS
ProductVersion: 11.2.1
BuildVersion:   20D74
sample code
- 本記事のsample codeは以下で公開しています。
github.com
参考サイト
- ASGIの説明は以下の資料がわかりやすいので一読しておくと良いです。
ASGI(非同期サーバゲートウェイインターフェース)の概要 - Speaker Deck - uvicornの公式サイト
Uvicorn
環境構築
$ python -m venv env
$ python -V
Python 3.9.1
$ source ./env/bin/activate
- package
$ pip install uvicorn==0.13.4
$ pip install websockets==8.1
簡単なechoサーバの例
- 簡単な例です。このmain.pyをuvicornで起動し、ブラウザで動作を見ていきます。
- main.py
# httpとwebsocketの条件分岐
async def app(scope, receive, send):
    if scope['type'] == 'http':
        await http_applciation(scope, receive, send)
    elif scope['type'] == 'websocket':
        await websocket_applciation(scope, receive, send)

# httpの処理
async def http_applciation(scope, receive, send):
    await send({
        'type': 'http.response.start',
        'status': 200,
        'headers': [
            [b'content-type', b'text/plain'],
        ],
    })
    await send({
        'type': 'http.response.body',
        'body': b'Hello, world!',
    })

# websocketの処理
async def websocket_applciation(scope, receive, send):
    while True:
        event = await receive()

        if event['type'] == 'websocket.connect':
            await send({
                'type': 'websocket.accept'
            })

        if event['type'] == 'websocket.disconnect':
            break

        if event['type'] == 'websocket.receive':
            await send({
                'type': 'websocket.send',
                'text': event['text']
            })
- uvicorn起動
$ uvicorn main:app --host 127.0.0.1 --port 8000
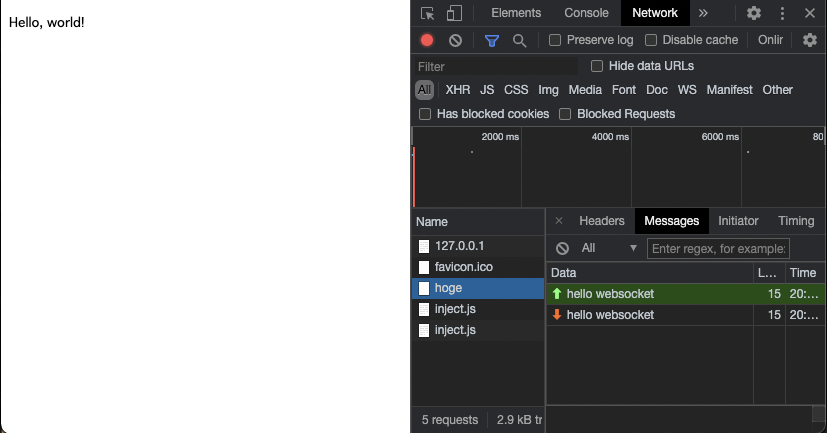
この状態でChromeで http://127.0.0.1:8000つなぐと、scope['type'] == 'http'となり以下のように表示されます。

今度はChromeのDeveloper Toolsを開き、Consoleで以下のように実行し、Network Tabを覗くとechoしていることがわかります。


Console上で実行したコマンドは以下になります
- また、
ws://127.0.0.1:8000/hogeのhogeとした部分は他の文字列でも大丈夫ですが、この文字列が後のroom毎のchatを実現する方法のミソになります。
const ws = new WebSocket(`ws://127.0.0.1:8000/hoge`)
ws.send("hello websocket")
ws.send("hello websocket")
ws.readyState
ws.close()
ws.readyState
- ChromeのConsole側でjavascriptを実行しましたが、これがWebSocketのclient側になります。
- new WebSocket(
WebSocket ServerのURL)とすることで、WebSocket Serverに接続し、sendすることでメッセージを送信、後で使いますがWebSocket Server側からのメッセージはonmessageを使うことで受け取ることができます。 - readyStateはWebSocketの接続状態を表すステータスです。今回は簡単な例なので使いませんが覚えておくと状態毎に処理をかき分けることができます。接続状態の直については以下を参照ください。
WebSocket.readyState - Web API | MDN
scopeの中身を覗いてみる
- echoサーバの例で作成したように、ASGIは3つの引数でscope, receive, sendを使って処理をします。
async def app(scope, receive, send)以下のASGIのdocumentをみると、
scopeに接続してきたclientからのリクエスト情報が含まれているので、scopeの情報を上手く使えばweb chatが作れです。
HTTP & WebSocket ASGI Message Format — ASGI 3.0 documentationですのでとりあえず、scopeの中身を全部printして見ようと思います。
async def app(scope, receive, send):
    await print_websocket_item(scope, receive, send)
    if scope['type'] == 'http':
        await http_applciation(scope, receive, send)
    elif scope['type'] == 'websocket':
        await websocket_applciation(scope, receive, send)


async def http_applciation(scope, receive, send):
    await send({
        'type': 'http.response.start',
        'status': 200,
        'headers': [
            [b'content-type', b'text/plain'],
        ],
    })
    await send({
        'type': 'http.response.body',
        'body': b'Hello, world!',
    })


async def websocket_applciation(scope, receive, send):
    while True:
        event = await receive()

        if event['type'] == 'websocket.connect':
            await send({
                'type': 'websocket.accept'
            })

        if event['type'] == 'websocket.disconnect':
            break

        if event['type'] == 'websocket.receive':
            await send({
                'type': 'websocket.send',
                'text': event['text']
            })


async def print_websocket_item(scope, receive, send):
    print('-------------scope--------------')
    print('scope: {}'.format(scope))
    print('-------------receive--------------')
    print('receive: {}'.format(receive))
    print('-------------send--------------')
    print('send: {}'.format(send))
- uvicorn起動
$ uvicorn main:app --host 127.0.0.1 --port 8000
- 先ほどと同じように Chromeでhttp://127.0.0.1:8000に接続し、Console側で以下を実行します。
const ws = new WebSocket(`ws://127.0.0.1:8000/hoge`)
- python側のprint結果をみると、scopeはdict型情報を持っていて、特にheadersはList型でさらにtuple型でvalueが入っていて、さらにその中の直はbyte型で情報を持っています。
- また、headersのsec-websocket-key格納されている直がclient側で一意に決まり、pathに
ws://127.0.0.1:8000/hogeのhoge部分が入ります。 - このscopeのheaderがList型、tuple型、byte型でどうみても扱いにくいのでparseすることを考えます。
-------------scope--------------
scope: {'type': 'websocket', 'asgi': {'version': '3.0', 'spec_version': '2.1'}, 'scheme': 'ws', 'server': ('127.0.0.1', 8000), 'client': ('127.0.0.1', 58415), 'root_path': '', 'path': '/hoge', 'raw_path': '/hoge', 'query_string': b'', 'headers': [(b'host', b'127.0.0.1:8000'), (b'connection', b'Upgrade'), (b'pragma', b'no-cache'), (b'cache-control', b'no-cache'), (b'user-agent', b'Mozilla/5.0 (Macintosh; Intel Mac OS X 11_2_1) AppleWebKit/537.36 (KHTML, like Gecko) Chrome/88.0.4324.192 Safari/537.36'), (b'upgrade', b'websocket'), (b'origin', b'http://127.0.0.1:8000'), (b'sec-websocket-version', b'13'), (b'accept-encoding', b'gzip, deflate, br'), (b'accept-language', b'ja-JP,ja;q=0.9,en-US;q=0.8,en;q=0.7'), (b'cookie', b'csrftoken=oFQAJkBQrkkzavO3Jh7sQ6gGAgJxQhChslEyOcURSqnpldaJkOiQCZUjGf6eokkB'), (b'sec-websocket-key', b'gccXCEU6HtT5WDbvVdip6w=='), (b'sec-websocket-extensions', b'permessage-deflate; client_max_window_bits')], 'subprotocols': []}
scope_type: <class 'dict'>
scopeのheaderをparseする
- headersをparseしていきます。
async def app(scope, receive, send):
    await print_websocket_item(scope, receive, send)
    if scope['type'] == 'http':
        await http_applciation(scope, receive, send)
    elif scope['type'] == 'websocket':
        await websocket_applciation(scope, receive, send)


async def http_applciation(scope, receive, send):
    await send({
        'type': 'http.response.start',
        'status': 200,
        'headers': [
            [b'content-type', b'text/plain'],
        ],
    })
    await send({
        'type': 'http.response.body',
        'body': b'Hello, world!',
    })


async def websocket_applciation(scope, receive, send):
    while True:
        event = await receive()

        if event['type'] == 'websocket.connect':
            await send({
                'type': 'websocket.accept'
            })

        if event['type'] == 'websocket.disconnect':
            break

        if event['type'] == 'websocket.receive':
            await send({
                'type': 'websocket.send',
                'text': event['text']
            })


async def print_websocket_item(scope, receive, send):
    print('-------------header--------------')
    header = HeaderParse(scope)
    print('header.keys: {}'.format(header.keys))
    print('header.keys_demo: {}'.format(header.keys_demo))
    print('header.as_dict: {}'.format(header.as_dict))
    print('header.as_dict_demo: {}'.format(header.as_dict_demo))


class HeaderParse:
    def __init__(self, scope):
        self._scope = scope

    @property
    def keys(self):
        return [header[0].decode() for header in self._scope["headers"]]

    @property
    def keys_demo(self):
        header_keys = []
        for header in self._scope["headers"]:
            header_keys.append(header[0].decode())
        return header_keys

    @property
    def as_dict(self):
        return {header[0].decode(): header[1].decode() for header in self._scope["headers"]}

    @property
    def as_dict_demo(self):
        header_as_dict = {}
        for header in self._scope["headers"]:
            header_as_dict[header[0].decode()] = header[1].decode()
        return header_as_dict
- HeaderParse classではscopeを受け取って、headersをparseしています。
- keysとkeys_demo、as_dictとas_dict_demoは全く同じ結果を返すのですが、リスト内包表記に慣れていないと逆にわかりにくいと思ったので用意しました。
- keysとas_dictの結果をみると以下のようになっており、いい感じで処理できそうです。
- おいおい、ちょっと待ってくれ、
@propertyってなんやねんという方は以下の議論をみておくと良いです。
Python 3.x - python3 プロパティの必要性が分かりません。|teratail @propertyをちゃんと理解しようとするとそれなりに大変なのですが、ここでは例えばas_dictか関数ですが今回、値のようなものとして見せたいので@propertyをつけています。その結果、関数であれば、
header.as_dict()として呼び出さないといけないのですが、header.as_dictあたかも直のように呼び出すことができています。keys
['host', 'connection', 'pragma', 'cache-control', 'user-agent', 'upgrade', 'origin', 'sec-websocket-version', 'accept-encoding', 'accept-language', 'cookie', 'sec-websocket-key', 'sec-websocket-extensions']
- as_dict
{'host': '127.0.0.1:8000', 'connection': 'Upgrade', 'pragma': 'no-cache', 'cache-control': 'no-cache', 'user-agent': 'Mozilla/5.0 (Macintosh; Intel Mac OS X 11_2_1) AppleWebKit/537.36 (KHTML, like Gecko) Chrome/88.0.4324.192 Safari/537.36', 'upgrade': 'websocket', 'origin': 'http://127.0.0.1:8000', 'sec-websocket-version': '13', 'accept-encoding': 'gzip, deflate, br', 'accept-language': 'ja-JP,ja;q=0.9,en-US;q=0.8,en;q=0.7', 'cookie': 'csrftoken=oFQAJkBQrkkzavO3Jh7sQ6gGAgJxQhChslEyOcURSqnpldaJkOiQCZUjGf6eokkB', 'sec-websocket-key': 'ocErEZ3UeNRQRwh8dVedoQ==', 'sec-websocket-extensions': 'permessage-deflate; client_max_window_bits'}
WebSocket Serverのclassを作り汎用化する
- headersをいい感じでparseできたのですが、これを使ってwebsocket_applciation関数で処理していくのはやや複雑になってきそうです。
- なのでWebSocket Serverの部分はheadersのparse部分も含めて、classでまとめておこうと思います。
async def app(scope, receive, send):
    if scope['type'] == 'http':
        await http_applciation(scope, receive, send)
    elif scope['type'] == 'websocket':
        await websocket_applciation(WebSocket(scope, receive, send))
        return


async def http_applciation(scope, receive, send):
    await send({
        'type': 'http.response.start',
        'status': 200,
        'headers': [
            [b'content-type', b'text/plain'],
        ],
    })
    await send({
        'type': 'http.response.body',
        'body': b'Hello, world!',
    })


async def websocket_applciation(ws):
    await ws.accept()
    try:
        while True:
            data = await ws.receive()
            await ws.send_text(data['text'])
    except:
        await ws.close()


class HeaderParse:
    def __init__(self, scope):
        self._scope = scope

    @property
    def keys(self):
        return [header[0].decode() for header in self._scope["headers"]]

    @property
    def as_dict(self):
        return {header[0].decode(): header[1].decode() for header in self._scope["headers"]}


class WebSocket:
    def __init__(self, scope, receive, send):
        self._scope = scope
        self._receive = receive
        self._send = send

    @property
    def headers(self):
        return HeaderParse(self._scope)

    @property
    def path(self):
        return self._scope["path"]

    async def accept(self):
        await self.receive()
        await self.send({
            "type": "websocket.accept"
        })

    async def close(self,):
        await self.send({
            "type": "websocket.close"
        })

    async def send(self, message):
        await self._send(message)

    async def receive(self):
        message = await self._receive()
        return message

    async def send_text(self, text):
        await self.send({
            "type": "websocket.send",
            "text": text
        })
- WebSocket classを作り、基本的な振る舞いをまとめました。
- Clientのstatusによってエラー処理をしたいところですが、今回は煩雑になるため入れないでおきます。
(例えばdisconnectイベントがきているのにserver側でreceiveを実行するなど)
*WebSocket classにしたことで、
async def websocket_applciation(ws)はWebSocketオブジェクト引数で受け取るように変更しています。 data = await ws.receive()部分でメッセージを受け取りawait ws.send_text(data['text'])でechoします。uvicorn起動
$ uvicorn main:app --host 127.0.0.1 --port 8000
- 先ほどと同じように Chromeでhttp://127.0.0.1:8000に接続し、Console側で以下を実行します。
const ws = new WebSocket(`ws://127.0.0.1:8000/hoge`)
ws.send("hello websocket")
同じようにechoできていることがわかります。

ここまでできたので、いよいよweb chatを作成していきます。
echoをweb画面に表示する。
いちいちChromeのConsoleでWebSocketするのは面倒なので、web画面からそうさできるようにします。
web画面側
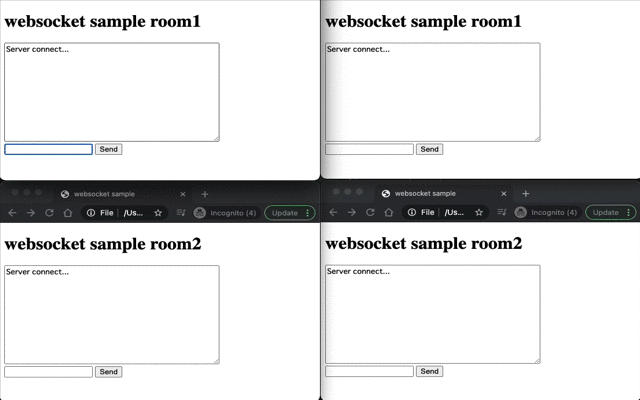
<!DOCTYPE html>
<html lang="en">
    <head>
        <meta charset="UTF-8" />
        <meta http-equiv="X-UA-Compatible" content="IE=edge" />
        <meta name="viewport" content="width=device-width, initial-scale=1.0" />
        <title>websocket sample</title>
    </head>
    <body>
        <h1>websocket sample</h1>
        <textarea id="messageTextArea" rows="10" cols="50"></textarea>
        <form>
            <input id="textMessage" type="text" />
            <input id="sendMessage" value="Send" type="button" />
        </form>
        <script src="main.js"></script>
    </body>
</html>
- 以下のような画面を作って、
id="textMessage"に入れたメッセージをWebSocket Server側に送信し、送信したメッセージと、WebSocket Server側から帰ってきたecho メッセージをid="messageTextArea"に表示します。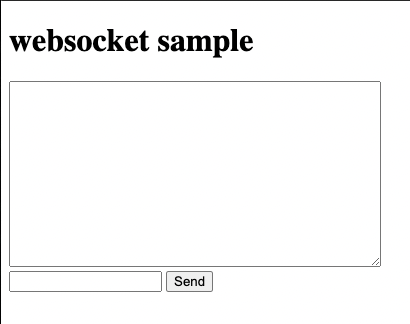
const webSocket = new WebSocket("ws://127.0.0.1:8000/hoge");
const text_message = document.querySelector("#textMessage");
const send_button = document.querySelector("#sendMessage");

webSocket.onopen = () => {
    messageTextArea.value += "Server connect...\n";
};

webSocket.onmessage = (message) => {
    messageTextArea.value += "Recieve From Server => " + message.data + "\n";
};

send_button.addEventListener("click", () => {
    sendMessage(text_message.value);
});

function sendMessage(message) {
    messageTextArea.value += "Send to Server => " + message + "\n";
    webSocket.send(message);
    text_message.value = "";
}
解説を書いておきますが、動かしてみた方が早いです。
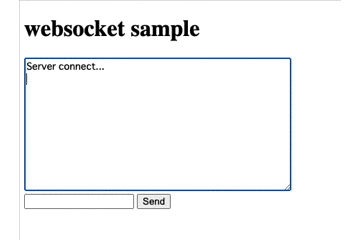
const text_message = document.querySelector("#textMessage");はid="textMessage"を探し、オブジェクトをtext_messageに格納します。const send_button = document.querySelector("#sendMessage");も同じです。webSocket.onopenは WebSocketのコネクションのreadyStateが1に変化したときに呼び出され、id="messageTextArea"にmessageTextArea.valueで直を表示します。この状態になれば、データの送受信できる準備ができたことを示します。send_button.addEventListenerはsend_buttonにclickイベントを追加し、clickされた時にsendMessage関数を実行します。sendMessage関数は呼び出された時に、引数のmessageをmessageTextArea.valueで直を表示し、webSocket.send(message);でWebSocket Serverに送信。また最後に、text_message.value = ""でinputエリアをクリアします。
WebSocket Clientにブロードキャストする
- 画面に表示することはできたので、これをWebSocket Serverに接続しているClient全体に送信します。
async def app(scope, receive, send):
    if scope['type'] == 'http':
        await http_applciation(scope, receive, send)
    elif scope['type'] == 'websocket':
        await websocket_applciation(WebSocket(scope, receive, send))
        return


async def http_applciation(scope, receive, send):
    await send({
        'type': 'http.response.start',
        'status': 200,
        'headers': [
            [b'content-type', b'text/plain'],
        ],
    })
    await send({
        'type': 'http.response.body',
        'body': b'Hello, world!',
    })

clients = {}


async def websocket_applciation(ws):

    await ws.accept()
    key = ws.headers.as_dict['sec-websocket-key']
    clients[key] = ws
    try:
        while True:
            data = await ws.receive()
            for client in clients.values():
                await client.send_text("ID: {} => {}".format(key, data['text']))
    except:
        await ws.close()
        del clients[key]


class HeaderParse:
    def __init__(self, scope):
        self._scope = scope

    @property
    def keys(self):
        return [header[0].decode() for header in self._scope["headers"]]

    @property
    def as_dict(self) -> dict:
        return {h[0].decode(): h[1].decode() for h in self._scope["headers"]}


class WebSocket:
    def __init__(self, scope, receive, send):
        self._scope = scope
        self._receive = receive
        self._send = send

    @property
    def headers(self):
        return HeaderParse(self._scope)

    @property
    def path(self):
        return self._scope["path"]

    async def accept(self):
        await self.receive()
        await self.send({
            "type": "websocket.accept"
        })

    async def close(self,):
        await self.send({
            "type": "websocket.close"
        })

    async def send(self, message):
        await self._send(message)

    async def receive(self):
        message = await self._receive()
        return message

    async def send_text(self, text):
        await self.send({
            "type": "websocket.send",
            "text": text
        })
clients = {}でdist型のclientsを準備してき、key = ws.headers.as_dict['sec-websocket-key']で接続してきたClientで一意になる情報を取り出し、clients[key] = wsで{各Clientのkey: WebSocket object }のペアを作るのがここのポイントです。data = await ws.receive()でWebSocket Serverから受信したdataをfor client in clients.values()で各ClientのWebSocket objectを取り出し、各Client毎にawait client.send_text("ID: {} => {}".format(key, data['text']))でメッセージを送信します。ここまでくればChatっぽくなりましたね。

chet room毎にブロードキャストする
今のままでは全てのClientにメッセージが送信されてしまうので、room毎にchatできるように修正します。
まずWebSocket Serverに接続する時のpath、
ws://127.0.0.1:8000/hogeのhoge部分をroom1とroom2に分けたいので、htmlとjsを2つに分けます。
room1
- 表示を変えたいので
h1の部分だけ変更します。 - また対応するjsを
main_room1.jsとします。
index_room1.html
<!DOCTYPE html>
<html lang="en">
    <head>
        <meta charset="UTF-8" />
        <meta http-equiv="X-UA-Compatible" content="IE=edge" />
        <meta name="viewport" content="width=device-width, initial-scale=1.0" />
        <title>websocket sample</title>
    </head>
    <body>
        <h1>websocket sample room1</h1>
        <textarea id="messageTextArea" rows="10" cols="50"></textarea>
        <form>
            <input id="textMessage" type="text" />
            <input id="sendMessage" value="Send" type="button" />
        </form>
        <script src="main_room1.js"></script>
    </body>
</html>
- WebSocket Serverに接続する時のpathを変えたいだけなので
const webSocket = new WebSocket("ws://127.0.0.1:8000/room1");とします。
main_room1.js
const webSocket = new WebSocket("ws://127.0.0.1:8000/room1");
const text_message = document.querySelector("#textMessage");
const send_button = document.querySelector("#sendMessage");

webSocket.onopen = () => {
    messageTextArea.value += "Server connect...\n";
};

webSocket.onmessage = (message) => {
    messageTextArea.value += "Recieve From Server => " + message.data + "\n";
};

send_button.addEventListener("click", () => {
    sendMessage(text_message.value);
});

function sendMessage(message) {
    messageTextArea.value += "Send to Server => " + message + "\n";
    webSocket.send(message);
    text_message.value = "";
}
room2
- room1と同じようにroom2として修正します。
index_room2.html
<!DOCTYPE html>
<html lang="en">
    <head>
        <meta charset="UTF-8" />
        <meta http-equiv="X-UA-Compatible" content="IE=edge" />
        <meta name="viewport" content="width=device-width, initial-scale=1.0" />
        <title>websocket sample</title>
    </head>
    <body>
        <h1>websocket sample room2</h1>
        <textarea id="messageTextArea" rows="10" cols="50"></textarea>
        <form>
            <input id="textMessage" type="text" />
            <input id="sendMessage" value="Send" type="button" />
        </form>
        <script src="main_room2.js"></script>
    </body>
</html>
main_room2.js
const webSocket = new WebSocket("ws://127.0.0.1:8000/room2");
const text_message = document.querySelector("#textMessage");
const send_button = document.querySelector("#sendMessage");

webSocket.onopen = () => {
    messageTextArea.value += "Server connect...\n";
};

webSocket.onmessage = (message) => {
    messageTextArea.value += "Recieve From Server => " + message.data + "\n";
};

send_button.addEventListener("click", () => {
    sendMessage(text_message.value);
});

function sendMessage(message) {
    messageTextArea.value += "Send to Server => " + message + "\n";
    webSocket.send(message);
    text_message.value = "";
}
main.py
async def app(scope, receive, send)部分でroom = scope['path']でpath部分をroomとしてwebsocket_applciationに引き渡します。websocket_applciationでは引数にroomを加え、if client.path == room:でpathがroomと一致するclientにだけメッセージを送信する判定をおこないます。
async def app(scope, receive, send):
    if scope['type'] == 'http':
        await http_applciation(scope, receive, send)
    elif scope['type'] == 'websocket':
        room = scope['path']
        await websocket_applciation(WebSocket(scope, receive, send), room)
        return


async def http_applciation(scope, receive, send):
    await send({
        'type': 'http.response.start',
        'status': 200,
        'headers': [
            [b'content-type', b'text/plain'],
        ],
    })
    await send({
        'type': 'http.response.body',
        'body': b'Hello, world!',
    })

clients = {}


async def websocket_applciation(ws,room):
    await ws.accept()
    key = ws.headers.as_dict['sec-websocket-key']
    clients[key] = ws
    try:
        while True:
            data = await ws.receive()
            for client in clients.values():
                if client.path == room:
                    await client.send_text("ID: {} => {}".format(key, data['text']))
    except:
        await ws.close()
        del clients[key]


class HeaderParse:
    def __init__(self, scope):
        self._scope = scope

    @property
    def keys(self):
        return [header[0].decode() for header in self._scope["headers"]]

    @property
    def as_dict(self) -> dict:
        return {h[0].decode(): h[1].decode() for h in self._scope["headers"]}


class WebSocket:
    def __init__(self, scope, receive, send):
        self._scope = scope
        self._receive = receive
        self._send = send

    @property
    def headers(self):
        return HeaderParse(self._scope)

    @property
    def path(self):
        return self._scope["path"]

    async def accept(self):
        await self.receive()
        await self.send({
            "type": "websocket.accept"
        })

    async def close(self,):
        await self.send({
            "type": "websocket.close"
        })

    async def send(self, message):
        await self._send(message)

    async def receive(self):
        message = await self._receive()
        return message

    async def send_text(self, text):
        await self.send({
            "type": "websocket.send",
            "text": text
        })
- 以下のようなにroom毎にchetできるようになりました。
後書き
- uvicornとwebsocketを利用すれば簡単にweb chatが実現しました。
- Django3.1ではASGIと非同期Viewに対応しているため、Django3.1ではwebsocketのprotocolできた時に、上記のようなwebsocket classを作成してしてあげれば、Django Channelsを使わなくてもwebsocketアプリケーションが作成できることになります。
- 今回の例ではわかりやすくするため、room毎にhtml,jsを分けて作成しましたが、もちろん動的に作成することが可能なので、Django3.1を利用したリッチなweb chatアプリケーションは後日作成して見ようと思います。
以上、uvicorn0.13.4を利用してweb chatを作成して、room毎のchatを実現する。でした。
【Django3.1】Djangoでsignup,login機能をgenericviewとdjango.contrib.authで最短で作成する。あとで見た目も。
なお本記事のソースコードはgithub上に公開しています。 login機能は公式documentを参考に作成していきます。 login確認の為に以下のコマンドで管理者ユーザを作成しておきます。 signup,login実装用のアプリケーションを作成しておきます。 まずベースとなる confug/urls.py accounts/urls.py このPathでレンダリングされる先はデフォルトでtemplateディレクトリ配下の デフォルトの通りregistration/login.htmlを以下のように作成します。 templates/registration/login.html たったこれだけです。 試しに先程作成した管理者ユーザでloginすると、以下のエラーになります。 実は ※一番下に追加しました。 この状態でもう一度、
http://127.0.0.1:8000/accounts/login/
にアクセスし、loginしてみましょう。 (例) loginユーザ名はどのページでも表示させたいので、一旦これをbase.htmlのbodyに入れてみます。 templates/base.html この状態で
http://127.0.0.1:8000/samplecrud/list/
にアクセスしてlogin前後を見てみましょう。 login前 無事表示出来ましたね! login出来ましたがlogoutする機能が有りません。 accounts/urls.py この状態で、
http://127.0.0.1:8000/accounts/logout/
にアクセスすると以下が表示されます。 confug/settings.py この状態で、
http://127.0.0.1:8000/accounts/logout/
にアクセスすると無事loginページにリダイレクトされました。 今の状態ではadmin site以外でユーザを作成するすべがないので、signup機能を実装します。 accounts/urls.py viewの設定 accounts/views.py レンダリング先の設定 templates/registration/signup.html 全くloginと同じでOKです。
この状態で
http://127.0.0.1:8000/accounts/signup/
にアクセスすると以下の用に表示されます。 signup,login機能は実装したものの、今の状態ではすべてのページが表示出来てしまいます。 具体的には、以下の と言っても制御は簡単で、 samplecrud/views.py この状態で
http://127.0.0.1:8000/samplecrud/list/
にアクセスするとアクセスできますが、、、 編集ボタンを押すと、login画面にリダイレクトされます。 ユーザ表示が少しかっこ悪かったので、navbarに表示させ、ドロップダウンでlogoutを表示させるようにします。 templates/base.html login前 login後 ドロップダウンでlogoutを表示します。 すこしかっこよくなりましたね。 本筋とは少しずれますが、見た目の変更をしやすくするために、base系のtemplateを変更しておきます。 templates/base_global.html それぞれ、title,head,header,body,footerを差し込めるようにし、bootstrapは全体でロード出来るようにしておきます。 そして templates/base.html 現時点で以下のフォルダ構成になっているはずです。 以下のリンクを参照するとわかるのですが、 なのでまず最初に templates/registration/login.html templates/registration/login.html labelは不要なので消し、 login画面の同様、 templates/registration/signup.html templates/registration/signup.html ちょっとはイケてる感じになりましたね。 以上、Djangoでsignup,login機能をgenericviewとdjango.contrib.auth.urlsで最短で作成する。あとで見た目も。でした。
本記事で行うこと
n-guitar.hatenablog.com
なお、すでに上記のアプリケーションでBootstrap5を導入している。
GitHub - n-guitar/django-samples at feature/signup/sample.generic-viewモチベーション
環境
$ sw_vers
ProductName:    macOS
ProductVersion: 11.1
BuildVersion:   20C69
$ python -V
Python 3.8.0
login機能の作成
Using the Django authentication system | Django documentation | Django事前準備 管理者用account作成
$ python manage.py createsuperuser
Username (leave blank to use 'XXXXX'): admin
Email address: test@test.com
Password:
Password (again):
Superuser created successfully.
signup,login実装用のアプリケーション作成
$ django-admin startapp accounts
settings.pyにも忘れずにアプリを追加しておきます。
confug/settings.py# <省略>
INSTALLED_APPS = [
'django.contrib.admin',
'django.contrib.auth',
'django.contrib.contenttypes',
'django.contrib.sessions',
'django.contrib.messages',
'django.contrib.staticfiles',
'samplecrud',
'accounts', # 追加
]
# <省略>
accounts/urls.pyを作成
現時点でaccountディレクトリは以下のようになっている想定です。
urlの設定
confug/urls.pyからaccounts/urls.pyのrouting設定をしておきます。from django.contrib import admin
from django.urls import path, include
urlpatterns = [
path('admin/', admin.site.urls),
path('samplecrud/', include('samplecrud.urls')),
path('accounts/', include('accounts.urls')),
]
accounts/urls.pyを作成していきます。
まずloginのURLを作成し、routing先はdjango.contrib.authのLoginViewを利用します。from django.urls import path
from django.contrib.auth import views as auth_views
urlpatterns = [
path('login/', auth_views.LoginView.as_view(), name='login'),
]
registrationに配下に作成したlogin.htmlファイルになります。
path('accounts/login/', auth_views.LoginView.as_view(template_name='myapp/login.html')),とすることで任意の場所に設定することも出来ますが、デフォルトのままで行こうと思います。テンプレートの作成
<form action="" method="POST"> {% csrf_token %}
    {{ form.as_p }}
    <input type="submit" value="login">
</form>
この状態で
http://127.0.0.1:8000/accounts/login/
にアクセスしてみると以下のように表示されます。


デフォルトではlogin後は/accounts/profile/が表示されるようになっています。
今回は特にprofileページは必要ないので、 login後に表示されるページを変更してみます。login後のリダイレクトページ設定
settings.pyに以下の用に記述を追加するだけです。
listはサンプルアプリに設定してあるpath('list/', ListPage.as_view(), name='list'),としておきます。
confug/settings.py# <上記省略>
LOGIN_REDIRECT_URL = 'list'
無事login出来ました。

しかしながら本当にlogin出来ているのか分かりにくいのでloginユーザを表示してみたいと思います。login userの表示
{{ user.username }}をtemplateに加えるだけなのですがloginしていない時表示出来ないので、条件分岐を入れます。
{% if user.is_authenticated %}でtrueの時{{ user.username }}を表示し、loginしていないときはloginページのリンク先を表示しておくことにします。{% if user.is_authenticated %}
{{ user.username }}
{% else %}
<a href="{% url 'login' %}">Login</a></li>
{% endif %}
{% load static %}
<!DOCTYPE html>
<html lang="ja">
<head>
<meta charset="UTF-8">
<link rel="stylesheet" type="text/css" href="{% static 'css/bootstrap.min.css' %}">
<script src="{% static 'js/bootstrap.bundle.min.js' %}"></script>
<title>sample app</title>
</head>
<header>
<nav class="navbar navbar-expand-lg navbar-dark bg-dark">
<div class="container-fluid">
<a class="navbar-brand" href="#">Todo Sample App</a>
<button class="navbar-toggler" type="button" data-bs-toggle="collapse" data-bs-target="#navbarNavAltMarkup" aria-controls="navbarNavAltMarkup" aria-expanded="false" aria-label="Toggle navigation">
<span class="navbar-toggler-icon"></span>
</button>
<div class="collapse navbar-collapse" id="navbarNavAltMarkup">
<div class="navbar-nav">
<a class="nav-link" href="{% url 'list' %}">List</a>
<a class="nav-link" href="{% url 'create' %}">Create</a>
</div>
</div>
</div>
</nav>
</header>
<body>
{% if user.is_authenticated %}
   {{ user.username }}
{% else %}
      <a href="{% url 'login' %}">Login</a></li>
 {% endif %}
{% block Content %}
{% endblock Content %}
</body>
<footer>
<div class="fixed-bottom">
<p class="float-end m-2">create by haku-mai</p>
</div>
</footer>
</html>

login後

ちょっとかっこ悪いですが、見た目は後の章でなおします。logout
logout機能もdjango.contrib.authに用意されているため以下の用に設定します。from django.urls import path
from django.contrib.auth import views as auth_views
urlpatterns = [
path('login/', auth_views.LoginView.as_view(), name='login'),
path('logout/', auth_views.LogoutView.as_view(), name='logout'),
]

公式documentとおりだとregistration/logged_out.htmlにレンダリングされるはずなのですが、存在していないとadmin siteに飛ばされてしまうようです。
今回はloginした場合は再度loginページに飛ばしてほしいので以下の用に設定します。# <上記省略>
LOGIN_REDIRECT_URL = 'list'
LOGOUT_REDIRECT_URL = 'login' #追加
signup機能の作成
loginみたく、デフォルトで用意されている機能は機能はないものの、UserCreationFormとCreateViewを組み合わせることで簡単に作成することが出来ます。
まずURLの設定from django.urls import path
from django.contrib.auth import views as auth_views
from .views import SignupPage
urlpatterns = [
path('login/', auth_views.LoginView.as_view(), name='login'),
path('logout/', auth_views.LogoutView.as_view(), name='logout'),
path('signup/', SignupPage.as_view(), name='signup'),
]
from django.urls import reverse_lazy
from django.views import generic
from django.contrib.auth.forms import UserCreationForm

class SignupPage(generic.CreateView):
    form_class = UserCreationForm
    success_url = reverse_lazy('login')
    template_name = 'registration/signup.html'
<form action="" method="POST"> {% csrf_token %}
  {{ form.as_p }}
  <input type="submit" value="signup">
</form>

簡単ですね。
ちゃんとpasswordの確認まで行ってくれています。
試しにユーザを作成してログインしてみると、ちゃんとログインできていることが分かります。

※user1と表示されていますね。アクセス制御
なので編集機能だけ、ログインしていないと操作出来ないようにしたいと思います。CreatePage、UpdatePage、DeletePageが編集機能にあたるのでそれを制御します。
samplecrud/views.pyfrom django.shortcuts import render
from .models import Todo
from django.views import generic
from django.urls import reverse_lazy
class ListPage(generic.ListView):
model = Todo
template_name = 'list.html'
class CreatePage(generic.CreateView):
model = Todo
template_name = 'create.html'
fields = ('title','memo')
success_url = reverse_lazy('list')
class UpdatePage(generic.UpdateView):
model = Todo
template_name = 'update.html'
fields = ('title','memo')
success_url = reverse_lazy('list')
class DeletePage(generic.DeleteView):
model = Todo
template_name = 'delete.html'
success_url = reverse_lazy('list')
LoginRequiredMixinを利用し、制御したいviewに継承すればいいだけです。from django.shortcuts import render
from .models import Todo
from django.views import generic
from django.urls import reverse_lazy
from django.contrib.auth.mixins import LoginRequiredMixin #追加
class ListPage(generic.ListView):
model = Todo
template_name = 'list.html'
class CreatePage(LoginRequiredMixin, generic.CreateView): #変更
model = Todo
template_name = 'create.html'
fields = ('title','memo')
success_url = reverse_lazy('list')
class UpdatePage(LoginRequiredMixin, generic.UpdateView): #変更
model = Todo
template_name = 'update.html'
fields = ('title','memo')
success_url = reverse_lazy('list')
class DeletePage(LoginRequiredMixin, generic.DeleteView): #変更
model = Todo
template_name = 'delete.html'
success_url = reverse_lazy('list')


しかも、URLがhttp://127.0.0.1:8000/accounts/login/?next=/samplecrud/update/1になっているのですが
ログインすると、もともとアクセスしたかったページに戻ってくることが出来ます。

すごく便利ですよね。見た目の変更
ユーザ表示の変更
{% load static %}
<!DOCTYPE html>
<html lang="ja">
<head>
    <meta charset="UTF-8">
    <link rel="stylesheet" type="text/css" href="{% static 'css/bootstrap.min.css' %}">
    <script src="{% static 'js/bootstrap.bundle.min.js' %}"></script>

    <title>sample app</title>
</head>
<header>
  <nav class="navbar navbar-expand-lg navbar-dark bg-dark">
    <div class="container-fluid">
      <a class="navbar-brand" href="#">Todo Sample App</a>
      <button class="navbar-toggler" type="button" data-bs-toggle="collapse" data-bs-target="#navbarSupportedContent" aria-controls="navbarSupportedContent" aria-expanded="false" aria-label="Toggle navigation">
        <span class="navbar-toggler-icon"></span>
      </button>
      <div class="collapse navbar-collapse" id="navbarSupportedContent">
        <ul class="navbar-nav me-auto mb-2 mb-lg-0">
          <li class="nav-item">
            <a class="nav-link" href="{% url 'list' %}">List</a>
          </li>
          <li class="nav-item">
            <a class="nav-link" href="{% url 'create' %}">Create</a>
          </li>
        </ul>
        {% if user.is_authenticated %}
          <a class="nav-link dropdown-toggle" href="#" id="navbarDropdown" role="button" data-bs-toggle="dropdown" aria-expanded="false">{{ user.username }}</a>
          <ul class="dropdown-menu dropdown-menu-end" aria-labelledby="navbarDropdown">
            <li><a class="dropdown-item" href="{% url 'logout' %}">Logout</a></li>
          </ul>
        {% else %}
        <a class="btn btn-outline-success btn-sm" href="{% url 'login' %}">Login</a></li>
        {% endif %}
      </div>
    </div>
  </nav>
</header>

<body>
    {% block Content %}
    {% endblock Content %}
</body>
<footer>
    <div class="fixed-bottom">
        <p class="float-end m-2">create by haku-mai</p>
    </div>
</footer>
</html>


base templateの修正
signup,loginの見た目をいいかんじにしたいのですが、base.htmlを継承すると、navbarまで表示してしまうので、独自で画面を作成できるように編集します。
新しくbase_global.htmlを作成し、以下のように設定します。{% load static %}
<!DOCTYPE html>
<html lang="ja">
<head>
<meta charset="UTF-8">
<link rel="stylesheet" type="text/css" href="{% static 'css/bootstrap.min.css' %}">
<script src="{% static 'js/bootstrap.bundle.min.js' %}"></script>
{% block HeadContent %}
{% endblock HeadContent %}
<title>
{% block TitleContent %}
sample app
{% endblock TitleContent %}
</title>
</head>
<header>
{% block HeaderContent %}
{% endblock HeaderContent %}
</header>
<body>
{% block BodyContent %}
{% endblock BodyContent %}
</body>
<footer>
{% block FooterContent %}
{% endblock FooterContent %}
</footer>
</html>
base.htmlを以下のように変更します。{% extends 'base_global.html' %}
{% load static %}
{% block HeaderContent %}
<nav class="navbar navbar-expand-lg navbar-dark bg-dark">
<div class="container-fluid">
<a class="navbar-brand" href="#">Todo Sample App</a>
<button class="navbar-toggler" type="button" data-bs-toggle="collapse" data-bs-target="#navbarSupportedContent" aria-controls="navbarSupportedContent" aria-expanded="false" aria-label="Toggle navigation">
<span class="navbar-toggler-icon"></span>
</button>
<div class="collapse navbar-collapse" id="navbarSupportedContent">
<ul class="navbar-nav me-auto mb-2 mb-lg-0">
<li class="nav-item">
<a class="nav-link" href="{% url 'list' %}">List</a>
</li>
<li class="nav-item">
<a class="nav-link" href="{% url 'create' %}">Create</a>
</li>
</ul>
{% if user.is_authenticated %}
<a class="nav-link dropdown-toggle" href="#" id="navbarDropdown" role="button" data-bs-toggle="dropdown" aria-expanded="false">{{ user.username }}</a>
<ul class="dropdown-menu dropdown-menu-end" aria-labelledby="navbarDropdown">
<li><a class="dropdown-item" href="{% url 'logout' %}">Logout</a></li>
</ul>
{% else %}
<a class="btn btn-outline-success btn-sm" href="{% url 'login' %}">Login</a></li>
{% endif %}
</div>
</div>
</nav>
{% endblock HeaderContent %}
{% block BodyContent %}
{% block Content %}
{% endblock Content %}
{% endblock BodyContent %}
{% block FooterContent %}
<div class="fixed-bottom">
<p class="float-end m-2">create by haku-mai</p>
</div>
{% endblock FooterContent %}
base_head.htmlから読み込み、header,footerを差し込みます。
{% block BodyContent %}の中に{% block Content %}を元のまま用意しておき、他のtemplateファイルには変更がないようにしておきます。
上記の変更は、今までの見た目には何も変更は有りません。

login画面の修正
{{ form.as_p }}はいろいろな機能を持っているので、これを分解しなければなりません。
【Django3.1】Djangoで作成したアプリケーションにBootstrap5-beta1を導入し、見た目を整える。 - 米が食べたいぜぇ〜 haku-maiのブログ{{ form.as_p }}を展開して記述します。{% if form.errors %}
<p>Please enter a correct username and password. Note that both fields may be case-sensitive.</p>
{% endif %}
<form action="" method="POST"> {% csrf_token %}
<p>
<label for="{{ form.username.id_for_label }}">{{ form.username.label }}:</label>
<input type="text" name="{{ form.username.html_name }}" autofocus=""
autocapitalize="none" autocomplete="{{ form.username.html_name }}" maxlength="150" required="" id="{{ form.username.id_for_label }}">
</p>
<p>
<label for="{{ form.password.id_for_label }}">{{ form.password.label }}:</label>
<input type="password" name="{{ form.password.html_name }}"
autocomplete="current-password" required="" id="{{ form.password.id_for_label }}">
</p>
{% if form.errors %}
{% for key,value in form.errors.items %}
{{ value }}
{% endfor %}
{% endif %}
<input type="submit" value="login">
</form>
同じ画面を表示することができ、問題なくlogin可能です。
※{% for item in form %}でform文を作成することも出来るのですが、上記のほうが個人的にわかりやすいので、上記のママとします。
分解できたので、見た目を整えていきます。{% extends 'base_global.html' %}
{% block HeadContent %}
<style>
.login-form {
width: 340px;
margin: 100px auto;
font-size: 15px;
}
.form-group {
margin-bottom: 1rem;
}
.form-control, .btn {
min-height: 38px;
}
.btn {
font-size: 15px;
font-weight: bold;
}
.btn-block {
display: block;
width: 100%;
}
</style>
{% endblock HeadContent %}
{% block BodyContent %}
<div class="login-form">
<dev class="text-center">
<form style="max-width:300px;margin:auto" action="" method="POST"> {% csrf_token %}
<h1 class="h3 mb-3 font-weight-normal">ToDo App</h1>
<div class="form-group">
<input class="form-control" type="text" placeholder="Username"
name="{{ form.username.html_name }}" autofocus="" autocapitalize="none"
autocomplete="{{ form.username.html_name }}" maxlength="150"
required="" id="{{ form.username.id_for_label }}">
</div>
<div class="form-group">
<input class="form-control" type="password" placeholder="Password"
name="{{ form.password.html_name }}" autocomplete="current-password"
required="" id="{{ form.password.id_for_label }}">
</div>
<div class="form-group">
<button type="submit" class="btn btn-primary btn-block">Login</button>
</div>
<p class="text-center"><a href="{% url 'signup' %}">Create an Account</a></p>
{% if form.errors %}
{% for key,value in form.errors.items %}
{{ value }}
{% endfor %}
{% endif %}
</form>
<p class="mt-5 mb-3 text-muted">© 2021 haku-mai</p>
</dev>
</div>
{% endblock BodyContent %}
class="login-form"とclass="form-group"でくくることで見た目を整えます。
細かい部分はstyleで修正すると少しはイケてる感じになりました。
signup画面の修正
{{ form.as_p }}を一度分解してみます。<form action="" method="POST"> {% csrf_token %}
<p>
<label for="{{ form.username.id_for_label }}">Username:</label>
<input type="text" name="{{ form.username.html_name }}" maxlength="150"
autocapitalize="none" autocomplete="{{ form.username.html_name }}"
autofocus="" required="" id="{{ form.username.id_for_label }}">
<span class="helptext">Required. 150 characters or fewer. Letters, digits and @/./+/-/_ only.</span>
</p>
<p>
<label for="{{ form.password1.id_for_label }}">Password:</label>
<input type="password" name="{{ form.password1.html_name }}"
autocomplete="new-password" required="" id="{{ form.password1.id_for_label }}">
<span class="helptext"></span>
</p>
<ul>
<li>Your password can’t be too similar to your other personal information.</li>
<li>Your password must contain at least 8 characters.</li>
<li>Your password can’t be a commonly used password.</li>
<li>Your password can’t be entirely numeric.</li>
</ul>
<p></p>
<p>
<label for="{{ form.password2.id_for_label }}">Password confirmation:</label>
<input type="password" name="{{ form.password2.html_name }}"
autocomplete="new-password" required="" id="{{ form.password2.id_for_label }}">
<span class="helptext">Enter the same password as before, for verification.</span>
</p>
{% if form.errors %}
{% for key,value in form.errors.items %}
{{ value }}
{% endfor %}
{% endif %}
<input type="submit" value="signup">
</form>

同じ画面を表示することができ、問題なくsignup可能です。
分解できたので、見た目を整えていきます。{% extends 'base_global.html' %}
{% block HeadContent %}
<style>
.signup-form {
width: 340px;
margin: 100px auto;
font-size: 15px;
}
.form-group {
margin-bottom: 1rem;
}
.form-control, .btn {
min-height: 38px;
}
.btn {
font-size: 15px;
font-weight: bold;
}
.btn-block {
display: block;
width: 100%;
}
</style>
{% endblock HeadContent %}
{% block BodyContent %}
<div class="signup-form">
<form action="" method="POST"> {% csrf_token %}
<h1 class="h3 mb-3 font-weight-normal text-center">Welcome ToDo App</h1>
<p class="text-center">Please fill in this form to create an account!</p>
<div class="form-group">
<input class="form-control" type="text" placeholder="Username" name="{{ form.username.html_name }}" maxlength="150"
autocapitalize="none" autocomplete="{{ form.username.html_name }}"
autofocus="" required="" id="{{ form.username.id_for_label }}">
</div>
<div class="form-group">
<input class="form-control" type="password" placeholder="password" name="{{ form.password1.html_name }}"
autocomplete="new-password" required="" id="{{ form.password1.id_for_label }}">
</div>
<div class="form-group">
<input class="form-control" type="password" placeholder="Password confirmation" name="{{ form.password2.html_name }}"
autocomplete="new-password" required="" id="{{ form.password2.id_for_label }}">
</div>
<div class="form-group">
<button type="submit" class="btn btn-success btn-block">Signup</button>
</div>
{% if form.errors %}
{% for key,value in form.errors.items %}
{{ value }}
{% endfor %}
{% endif %}
<p class="text-center">Already have an account? <a href="{% url 'login' %}">login</a></p>
</form>
<p class="text-center mt-5 mb-3 text-muted">© 2021 haku-mai</p>
</div>
{% endblock BodyContent %}
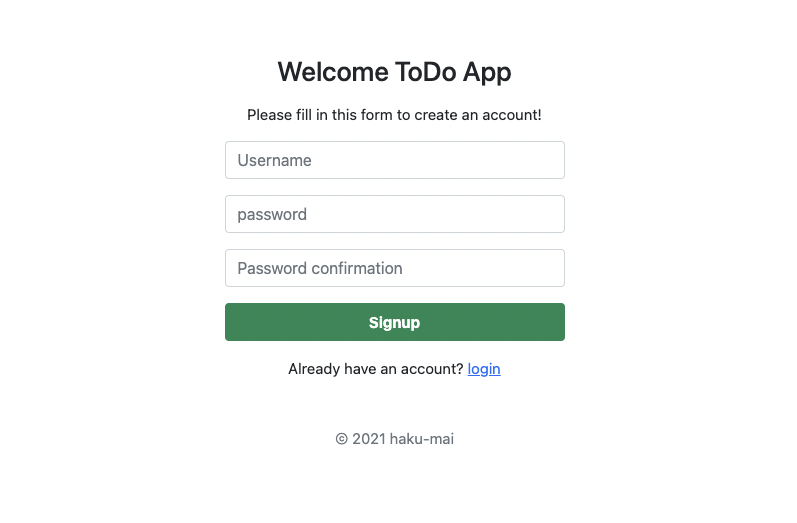
【mac issue】M1 MacBook Airの環境セットアップ(zsh/pyenv/python/Homebrew/docker/他ansibleでセットアップ)
- mac issue系
- 本記事で行うこと
- 環境
- まとめ
- Homebrewセットアップ
- gitセットアップ
- viscodeインストール (4/6追記)
- iTerm2インストール
- pyenv/python3.9インストール
- ansibleインストール
- ansible実行
- karabiner
- zsh
- docker m1 preview
- nvm/node.js
- golang/goenv
mac issue系
- 自分のメモようなので雑です。
本記事で行うこと
- M1 MacBook Airのセットアップを記録する
環境
- M1 Macbook Air
$ sw_vers
ProductName:    macOS
ProductVersion: 11.1
BuildVersion:   20C69
$ uname -m
arm64
まとめ
| 項目 | セットアップ方法 |
|---|---|
| Homebrew&git | Homebrewセットアップ |
| gitセットアップ | gitセットアップ |
| vscode m1 | viscodeインストール |
| iTerm2 | iTerm2インストール |
| pyenv/python3.9 | pyenv/python3.9インストール |
| ansible | ansibleインストール |
| ansible(chrome/firefox/その他諸々) | ansible実行 |
| zsh | zsh |
| docker | docker m1 preview |
| node.js | nvm/node.jsインストール |
| golang | golang install |
Homebrewセットアップ
公式ページ:https://brew.sh/index_ja.html - ※ちなみにgitも同時にインストールしてくれる
$ /bin/bash -c "$(curl -fsSL https://raw.githubusercontent.com/Homebrew/install/HEAD/install.sh)"
$ export PATH=$PATH:/opt/homebrew/bin:/opt/homebrew/sbin
$ brew doctor
Your system is ready to brew.

$ vi ~/.zshrc
gitセットアップ
$ git --version
git version 2.24.3 (Apple Git-128)

$ git config --global user.name "{username}"
$ git config --global user.email "{email}"
promptにgit表示させる git/contrib/completion at master · git/git · GitHub
$ mkdir ~/.zsh
$ cd ~/.zsh
$ curl -O https://raw.githubusercontent.com/git/git/master/contrib/completion/git-completion.zsh
$ curl -O https://raw.githubusercontent.com/git/git/master/contrib/completion/git-prompt.sh
$ ls -l
total 2952
-rw-r--r--  1 haku-mai  staff  1058991  1 31 16:05 git-completion.bash
-rw-r--r--  1 haku-mai  staff   174722  1 31 15:55 git-completion.zsh
-rw-r--r--  1 haku-mai  staff   271156  1 31 15:57 git-prompt.sh

$ vi ~/.zshrc
# Git
fpath=(~/.zsh $fpath)
if [ -f ${HOME}/.zsh/git-completion.zsh ]; then
       zstyle ':completion:*:*:git:*' script ~/.zsh/git-completion.zsh
fi
if [ -f ${HOME}/.zsh/git-prompt.sh ]; then
       source ${HOME}/.zsh/git-prompt.sh
fi
GIT_PS1_SHOWDIRTYSTATE=true
GIT_PS1_SHOWUNTRACKEDFILES=true
GIT_PS1_SHOWSTASHSTATE=true
GIT_PS1_SHOWUPSTREAM=auto
setopt PROMPT_SUBST ; PS1='[%n@ %c$(__git_ps1 " (%s)")]$ '
viscodeインストール (4/6追記)
vscodeはgithubのアカウントを連携していくことで設定が共有できる。
settings.jsonを今までgit管理していたが不要になり本当に楽になった。
Download Visual Studio Code - Mac, Linux, Windows
正式対応したのでUniversal版をインストール

codeコマンドを使いたいのでpath設定

iTerm2インストール
以下をダウンロード&インストール
Downloads - iTerm2 - Mac OS Terminal Replacement
pyenv/python3.9インストール
基本的にpythonプログラムを書くときはpyenvを利用します。
m1に対応しているのはpython3.9.1からになります。
Python Release Python 3.9.1 | Python.org
$ brew install pyenv
# pyenv
eval "$(pyenv init -)"
$ pyenv install 3.9.1
$ pyenv global 3.9.1
$ pyenv versions
  system
* 3.9.1 (set by /Users/haku-mai/.pyenv/version)
$ vi ~/.zshrc
# pyenv
eval "$(pyenv init -)"
export PATH=$HOME/.pyenv/shims:$PATH
ansibleインストール
※pyenv環境でansibleを使いたかったがpipインストールエラーとなる。
デバッグに時間がかかりそうなので、homebrewでインストールする。
homebrewでインストールできるansibleはarm版に対応していました。
$ brew install ansible
$ ansible --version
ansible 2.10.5
  config file = None
  configured module search path = ['/Users/haku-mai/.ansible/plugins/modules', '/usr/share/ansible/plugins/modules']
  ansible python module location = /opt/homebrew/Cellar/ansible/2.10.6/libexec/lib/python3.9/site-packages/ansible
  executable location = /opt/homebrew/bin/ansible
  python version = 3.9.1 (default, Jan  8 2021, 12:11:08) [Clang 12.0.0 (clang-1200.0.32.28)]
ansible実行
GitHub - n-guitar/macbook-setup
$ git clone -b m1-macbook-air https://github.com/n-guitar/macbook-setup.git
$ $ ansible-playbook -i inventory mac_setup.yml
karabiner
左右のコマンドキーで入力切り替え。
Karabiner-Elements

zsh
以下を利用。
macbook-setup/.zshrc at m1-macbook-air · n-guitar/macbook-setup · GitHub
$ vi ~/. zshrc
# 補完機能
autoload -U compinit
compinit

# 色を利用
autoload -Uz colors
colors

# historyの重複削除
setopt histignorealldups
HISTFILE=~/.zsh_history
HISTSIZE=10000
SAVEHIST=10000

# よく使うAlias
alias ll='ls -la'
## arm版vscodeがstableになるまで
alias code='code-insiders'

# homebrew
export PATH=$PATH:/opt/homebrew/bin:/opt/homebrew/sbin

# Git
fpath=(~/.zsh $fpath)
if [ -f ${HOME}/.zsh/git-completion.zsh ]; then
       zstyle ':completion:*:*:git:*' script ~/.zsh/git-completion.zsh
fi
if [ -f ${HOME}/.zsh/git-prompt.sh ]; then
       source ${HOME}/.zsh/git-prompt.sh
fi
GIT_PS1_SHOWDIRTYSTATE=true
GIT_PS1_SHOWUNTRACKEDFILES=true
GIT_PS1_SHOWSTASHSTATE=true
GIT_PS1_SHOWUPSTREAM=auto
setopt PROMPT_SUBST ; PS1='[%n@ %c$(__git_ps1 " (%s)")]
$ '

# pyenv
eval "$(pyenv init -)"
export PATH=$HOME/.pyenv/shims:$PATH
2021/2/10追記 historyからコマンド補完
以下ツールを利用
https://github.com/zsh-users/zsh-autosuggestions/blob/master/INSTALL.md
$ git clone https://github.com/zsh-users/zsh-autosuggestions ~/.zsh/zsh-autosuggestions
$ vi ~/. zshrc
<中略>

# history補完
source ~/.zsh/zsh-autosuggestions/zsh-autosuggestions.zsh
2021/3/2追記 nvm
# vnm
export NVM_DIR="$HOME/.nvm"
[ -s "/opt/homebrew/opt/nvm/nvm.sh" ] && . "/opt/homebrew/opt/nvm/nvm.sh"  # This loads nvm
[ -s "/opt/homebrew/opt/nvm/etc/bash_completion.d/nvm" ] && . "/opt/homebrew/opt/nvm/etc/bash_completion.d/nvm"  # This loads nvm bash_completion
2021/6/26追記 nvm
# node
export PATH=$HOME/.nodebrew/current/bin:$PATH

# kubectl
[[ /usr/local/bin/kubectl ]] && source <(kubectl completion zsh)

# goenv
export GOENV_ROOT="$HOME/.goenv"
export PATH="$GOENV_ROOT/bin:$PATH"
docker m1 preview
以下previewページからダウンロード
2021/2/6時点で、問題なく動作しますね。
www.docker.com

$ docker --version
Docker version 20.10.1, build 831ebeae96

$ docker-compose --version
docker-compose version 1.27.4, build 40524192
※docker-composeも同時にインストールされるようになったんですね。楽。
nvm/node.js
nvm
$ brew install nvm
$ mkdir ~/.nvm
$ nvm --version
0.37.2
node.js
2021/3/2時点で以下を見ると正式サポートはしていないっぽい。
15.x上のソースからbuildしてつかえよって感じ。
Apple Silicon Support · Issue #37309 · nodejs/node · GitHub
LTSがないので、現時点の最新v15.10.0を入れる
$ nvm ls-remote |grep v15
        v15.0.0
        v15.0.1
        v15.1.0
        v15.2.0
        v15.2.1
        v15.3.0
        v15.4.0
        v15.5.0
        v15.5.1
        v15.6.0
        v15.7.0
        v15.8.0
        v15.9.0
       v15.10.0
# sourceからbuildする。10分程度かかる。
$ nvm install  v15.10.0
・・・
Now using node v15.10.0 (npm v7.5.3)
Creating default alias: default -> v15.10.0

$ node --version
v15.10.0
golang/goenv
公式手順 goenv/INSTALL.md at master · syndbg/goenv · GitHub
goenv install
$ git clone https://github.com/syndbg/goenv.git ~/.goenv
以下追記 $ vi ~/. zshrc
export GOENV_ROOT="$HOME/.goenv"
export PATH="$GOENV_ROOT/bin:$PATH"
eval "$(goenv init -)"
export GOPATH="$HOME/go"
export PATH="$GOROOT/bin:$PATH"
export PATH="$PATH:$GOPATH/bin"

$ exec $SHELL
golang install
1.16以上がM1対応。
$ goenv install --list
$ goenv install 1.16.4
Downloading go1.16.4.darwin-arm64.tar.gz...
-> https://golang.org/dl/go1.16.4.darwin-arm64.tar.gz
Installing Go Darwin arm 1.16.4...
Installed Go Darwin arm 1.16.4 to /Users/haku-mai/.goenv/versions/1.16.4

$ goenv local 1.16.4
$ go version
go version go1.16.4 darwin/arm64
適時追加